Pages

Friday, December 30, 2011

Christmas coasters

Here is the Christmas edition of my coasters!  Made to be reversible, each of these ended up with a different quilting design as I was trying many out.  I made twelve, for three sets of four for my coworkers. The best quilting design ended up being a free motion christmas bow.  Sadly I forgot to take photos of the quilting step.
The fabric choices.  I was trying to go for relatively secular.


Coasters post-assembly but pre-quilting.  I was able to make them much rounder than the first batch by drawing the circle line on them with that blue water-soluble marker.
All quilted and ready for gifting!


Sunday, December 11, 2011

Coasters

I made these coasters for our coffee table a while ago.  The fabric is wine glasses.  I had trouble keeping the shape perfectly round, and also it was challenging to think of interesting designs to quilt onto each of them.  I like the fabric because it's a nice color for all seasons, however on the small size of the coasters it's hard to actually tell that the fabric has glasses on it.

These were very quick and easy to make, as a result I am currently working on making Christmas coasters for my co-workers.


the glass fabric

finished coasters with a variety of designs quilted in

Saturday, November 5, 2011

Alphabet Animals Cont.

More animals for your viewing pleasure.  I've amassed these over the past few weeks.  I'm about halfway through the alphabet!  You'll notice there's no I because I felt the drawing in the pattern for "I" (Iguana) was clearly a chameleon instead of an iguana, so I'm going to draw one myself (eventually)...


Chickens - done out of order because I didn't own any brown fabric

Giraffe


horse
Jellyfish

Kangaroos


Lions

Monkeys - faces to be appliqued on later

Newts- they look like geckos but they're slimy and usually orange/black
Octopus

Saturday, October 29, 2011

Cat Wallhanging

I recently visited the Pacific International Quilt Festival, and bought up tons of great patterns and fabrics.  Now that I'm home and the high is wearing off, I'm wishing I had been less frugal and had spent even more!  Especially on cool fabrics, because lately I've been very disappointed with the selection at my local quilt shop.  One stand at the festival sold "fat sixteenth" bundles of batiks.  Fat sixteenths are tiny but perfect for all of my scrappy projects, including the current animal alphabet quilt.  I bought three bundles of eight fabrics, and which I had bought even more.  They all contained lovely batiks in all kinds of interesting shades, perfect for so many projects!  I will have to get into the field of online fabric shopping if I continue to be disappointed by my local store.

In other news, it is far past time to start on Christmas presents!  I'm still lacking an idea for the perfect present, and then there's the challenge of who gets a present.  This year I have four circles: immediate family (they don't usually get sewn presents), close family (I am trying for things that can be used year-round as opposed to Christmas centric), friends, and co-workers.  I have some ideas for my friends and co-workers, I am still not sure what to do for close family members.  I want something nice, but nice things take a long time to make!

Anyways, at the quilt festival one of the patterns I bought was for this cute wallhanging.  I whipped it up in just a few days.  The final wallhanging came out a little crooked, probably because I made it so rapidly.  I also didn't do any free motion stitching on it, aside from blanket stitching the outlines.  I would like to do more free motion on projects but never know what designs to do.  Really I need a book of just free motion ideas.

The wallhanging pattern came with the cute cat-shaped hanger and the fish buttons for embellishment.


Saturday, October 22, 2011

More alphabet animals

And more coming!  I bought a bunch of brown fabrics at the Pacific International Quilt Festival to round out my palate, so I am ready from critters like monkeys, horses, and lions.

Elephants
Fish
Speaking of the quilt festival, it's been neat to read other blogs and see the photos they took.  There was so much to see, I see photos on other blogs and don't even remember seeing the quilt!  So many patterns to buy too.  I found a bunch of fat sixteenths and bought three 8-packs (perfect size for alphabet animals) but now I'm wishing I had bought even more because they are so awesome!

Sunday, October 9, 2011

Newest Project: ABC Animal Quilt

Now that I have my new workspace, I finally get to sit back and decide which project to delve into.

On my to-do list:  Some hemming projects, placemats, and of course quilting my cat quilt.  But I decided to start out with something fun, just to get back in the hang of sewing.  I absolutely adore all of the patterns by Don't Look Now Quilts.  A friend of mine is having a baby, so in my excitement I ordered this pattern.  I really love fusible web applique projects and have done two quilts with this technique.  I am comfortable with it and find it enjoyable to do.  Additionally, this quilt allows me to use my most fun and crazy fabrics, and can be completed almost exclusively with scraps.  It's also a bit of "instant gratification" because I can complete a finished letter set in about an hour and feel very accomplished.  So I just decided to sit down and get started.
A-Alligator.  All of these blocks will be appliqued with additional details like, in this instance, eyeballs and smiles

B-Butterfly.  I am intentionally trying to use whichever fabric I use for the letters in the critter as well for some continuity.
D-Dinosaur.  You may note I skipped C (chicken) because I love crazy colors so much that I don't own any brown, tan, or beige fabrics.  Whoops!  For the dinos, I actually have an awesome dino fabric (used for the letters) that I wanted to incorporate. I decided it was too strange to use the dino fabric on the dino bodies, so it's in the letters and their spikes.  However, the cut is so small I'm not sure you get the fact that it's a dino fabric.
I took another shot on a darkers background so you can see their teeth and spikes better.

Finally...A Workspace!

Posts are finally going to pick up, as I have settled into a brand new apartment with a brand new quilting space.  This is my first ever personal sewing space (I used to just share with my mom) and it has been incredibly exciting to plan out and organize.

First I had to decide where in my apartment the sewing space would be located.  I originally wanted it in the corner of the living room because I grew up watching tv while sewing and I wanted to continue that tradition.  Well, it turns out we don't have a tv and probably won't get one for a while, and the only tv outlet in the apartment is right where I wanted my sewing table to go.  Additionally, I am known as a messy person so we didn't want it sitting in the living room looking messy for guests to see (although quilting is always a great conversation starter for someone in her 20's because it's so unexpected for many people).

Next thought was the bedroom, which is surprisingly large.  The debate became whether the desk should face the wall (takes up less space) or face the room (takes up more space).  I wanted to face the room because a wall is no fun to stare at while working.  So once we had a location, it came time to select a desk.

Last year I used my actual dorm desk as a sewing table.  It worked, but it wasn't really big enough at all, and I did many things like cutting and ironing on the floor.  I knew that I wanted a really large sewing table this time around, but large desks are expensive!  I checked out actual sewing cabinets, which are all awesome because they fold up and look like regular cabinets so you can't even tell they're for sewing, but the tiniest one (and it was quite tiny) was $600, and the one that was in a size range I wanted was over $1000.  Next I considered IKEA desks as an inexpensive option.  Most of their desks are to small, but they have a "make it yourself" desk option where you choose the table top and legs in a mix and match sort of scenario.  However, this would cost around $1000.  There was also a great IKEA dining table that folds down small, but it was $200.  So I did nothing for a while because I was debating the trade-off between cost and having a wonderful workspace, and trading to figure out how much I was really willing to pay.

Then, inspiration struck.  I work right across the street from Stanford's "Surplus Sales" department, where excess stuff is sold to the general public for cheap.  I had to go over to drop off about 50 surge protectors for my work, and while I was there decided to shop around.  Lo and behold they had tons of desks.  I started inquiring about prices and they were CHEAP.  The desk that I selected was—get this—a mere $15.  This thing is HUGE, has drawers on either side, and little pull-out extensions above each set of drawers to make the workspace even larger.  It was bigger and better than anything I had been shopping for, at an absolute fraction of the price.  All my life we have had to do cutting on the floor because of lack of table space, but with this sewing table I can actually set up my cutting board on the corner.  Additionally, I picked up (for free) a little table-top ironing board last year that fits perfectly on the desk.  Photos below.  Unfortunately the desk is so close to the wall that I couldn't get a good shot of the other side of it, but imagine a row of drawers on either side, plus a big shallow pull-out in the center for gadgets.
Set up with my cutting board on one side.  The black blob is our video monitor, this desk is also perfect for watching movies from bed. :)

All of my fabric stash in one drawer!  Its very exciting because I can actually flip through it for colors, whereas before it was in a big bag and impossible to work with.

Set up for my current fusible web project.  I took away the sewing machine and set up the ironing board!

Sunday, August 21, 2011

Tuffet Progress

As previously mentioned, I am on hiatus from quilting until the end of September when I move into a permanent apartment.  In the meantime I am working on an incredibly detailed (18 ct) needlepoint tuffet.  It was custom-made and is going to be completely awesome when I (very eventually) finish it.

The eight canvases that need to be completed
Working on this needlepoint has been surprisingly satisfying.  Because each object/fish/piece of coral is so small, I am constantly moving onto something new and not getting bored.  The colors are incredibly bright and fun, and I have the opportunity to incorporate lots of metallics.

The largest difficulties have been my crippling fear of trying to stitch such incredibly detailed painted creatures, and the extreme difficulty of determining the very subtle shading differences in the piece.  Below are a series of before/after pics on the parts of the needlepoint that I have completed so far.

The current canvas I am working on, in full


The first fish I stitched, before and after.  The oranges and yellows are metallic.

The lower left corner (before)
starfish stitched

sand stitched as well

A very intimidating fish.  Look at the detail!


base coat of stitches
The final (ish) version.  I am still unhappy with the choppiness of the black along his back and how angry his eye turned out to be.

So that is current status of my needlepoint.  More updates as more fish are completed!

Wednesday, August 3, 2011

Quitting

I don't think I've ever quit a project before, but I'm quitting one now.  I've had this parrot needlepoint for five years and have been working on it pretty much that entire time.  It started well but then I decided to add in sparkly thread, which it turns out is tedious and difficult and to sew with.  Then once I finally slogged through most of the sparkly stuff I needed to work on background plants, which I wanted to do in unconventional stitches.


The screwy part is above the center right.  It's supposed to be two shades of green but they're too similar in shading to each other.
For a long time I did nothing because I was paralyzed by indecision, and I've been unhappy with the stitch I did end up with.  Then yesterday I worked a ton and then realized at the end that the colors I was using weren't correct and I basically would need to rip out all the stitching.  So that's it.  If a project isn't fun then there's not really a reason for me to be doing it.  So I will set the parrots aside for the foreseeable future and instead start on my lovely fish tuffet, which I am *actually* excited about working on.

Monday, July 25, 2011

Trout Wall Hanging

In my first real test of my machine quilting abilities, my mom asked me to quilt a trout wall hanging that she had completed.  We worked together on choosing the border and then I was left to my own devices on the quilting.  This is only the second item that I have ever machine quilted, the first being a vest for my mom.  I was apprehensive because I found quilting the vest to be quite tedious, but quilting the wallhanging turned out to be very fun. Perhaps I am just getting more comfortable with machine quilting, it may also have helped that the wallhanging was a flat object and not a dimensional vest.

To quilt the wallhanging I searched for ocean/water free-motion designs and found the "ocean current" pattern from the 365 Days of Free Motion project.  I didn't want the background to all be water, so I decided to toss in some fish outlines.  This was inspired by the only quilt that I ever sent out to be quilted by someone else.  I did a block-of-the-month wildflower quilt and was pretty burned out by the time I finished the top.  I decided that I didn't want to do a half-assed quilting job on it and to this day am very happy that I had someone else do it.  The quilter did an amazing job, and my favorite part of the quilt was where she hid little critters into the stippling, such as dragonflies.  I wanted to do something similar here, basically hide little fish among the waves.

I created an easy fish stencil by literally just google searching trout pictures, tracing the outlines of the trout that I liked onto a piece of note paper directly from my computer screen (IE I didn't print out the trout pictures; I just leaned my screen back and traced directly on top of it.  This had the benefit of screen backlighting and the ability to resize the picture to whatever size I needed.  Then I cut out the trout outlines for  an easy stencil.

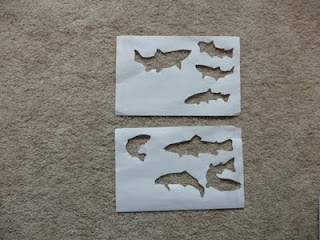
Finished trout "stencils"

I am still trying to find the perfect marking pen for fabric.  The standard my mom and I use are chalk pencils, but they rub off almost too easily and don't give a very fine line.  However, since this wallhanging had a white background, I ended up using the chalk pencils after all because I was very worried about lines not rubbing off.  

I basically planned out where I wanted my fish to be, traced those onto the wallhanging, and filled in with the ocean currents design.  For the first few parts of the wallhanging I also drew in my primary meandering line for the ocean currents because I wasn't very confident in my abilities, but I soon grew better.
Quilting in progress

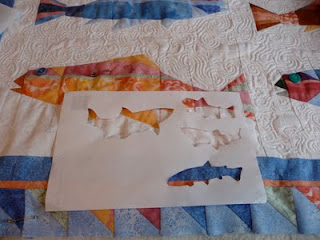
Stenciling on a new trout

As an "easter egg" I added in little flies at the mouth of each trout.  I call it an easter egg because the flies blend in so well that you can't see them unless you look incredibly closely.  But I like it that way, it's a special surprise for those who put in the effort.

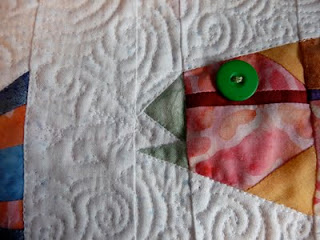
You can barely see the fly even in this close-up!

So finally, here are some pics of the finished quilt top.  Eventually I will probably add a pic of the entire wallhanging on the wall as well.  For the next couple of months it will just be needlepoint for me, but I'll try to post about that as well as time continues.


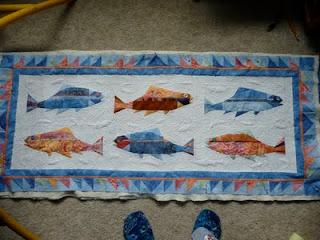
The entire quilt top, ready for binding

Monday, June 27, 2011

General Update

So it turns out my interest in blogging is hampered by my lack of interest in taking photos every step of the way.  I will have to start training myself to do so.

Quilting activities will remain pretty slow until October, when I will hopefully finally have a room to myself.  In the meantime I will be doing needlepoint, which requires considerably less space.  So if I get off my butt enough to take pictures of that I will upload them.  I am currently in the middle of two needlepoints.  One is of macaws, it's very pretty but I have been working on it for a number of years because I am crippled by indecisiveness when it comes to what stitches to use for each of the different background plants in the image.

The other needlepoint, which I have just barely started, is a needlepoint tuffet.  It's 8 separate canvases, a massive undertaking.  I hope to get one canvas done per year.  I am very intimidated because it's incredibly detailed and is going to require a lot of new stitches and techniques that I have never tried before.  At the same time I am excited by the beautiful design and the promise of a lasting heirloom once I actually finish it.
Above: the one fish I have actually done on my new needlepoint.

So those are the two projects I will probably be working on for the next few months.  In the short term, while I have the use of my mom's sewing room I made her a purse, following a pattern that I received for Christmas (I'm not yet skilled enough to try much of anything off-pattern).  I originally made myself a purse with this pattern a few months ago, and my mom was really excited by my choices of colors.  Colors have definitely always been my strong suit and picking out fabrics is pretty much my favorite part of any quilt (hence the reason I'm not a big fan of kits...they take out the best part!) and my mom felt that the fabrics I had chosen for my purse were never colors she would have thought to pick...but together they looked really nice.  Below are photos of my original purse.


So when it came to my mom's purse we picked colors together and I was very happy with the final product (I added in a few improvements over mine, such as store-bought handles and a cell-phone pocket) but she was a bit disappointed in the colors because the outer pocket takes up once entire side of the purse (as you can see with the teal above), essentially obscuring the main fabric which was her favorite part.  So I just told her to carry the purse backwards, with the pocket towards her, so that the side that is entirely main fabric will be facing out.  Anyways, you learn with every project.

My next projects are to do some machine quilting.  My mom is just finishing up a paper-pieced fish wallhanging that she would like for me to quilt for her.  Additionally, I need to eventually quilt my Stairway to Cat Heaven quilt, although that is a far ways off I think.  I want to buy a big thing of cheap muslin and just do a ton of free motion practice before I quilt anything for real.

So anyways, that's a brief update.  Hopefully I'll get around to taking some more photos and uploading them here.  Expect infrequent updates until October.