Pages

Sunday, December 16, 2012

Quality Sewing Time

I have been working away on a second iteration of the Stairway to Cat Heaven Quilt, and been having a lot of fun. I have never made the same project twice before and wasn't sure if I would like it, but I'm still enjoying the quilt just as much now as before.

The quilt consists of a bunch of nine patch squares. When I started on the first few, they were coming out wobbly, and not sewn perfectly.
1/8" off!
My solution was to spray starch the heck out of everything, and pin before I stitched so I wasn't wobbling around trying to line up the pieces while stitching. The spray starch made a huge difference! The fabric visibly stopped jumping and bunching as it went through the machine.  Very satisfying.

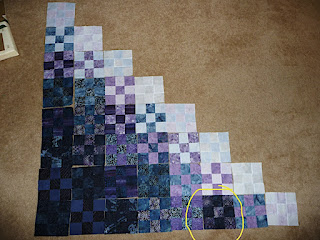
One reason I think I am enjoying this so much is that I LOVE color, and this quilt design is very heavily based around color. Lots of thought went into the color pairings for each nine patch square, and even more thought into the final layout, which is the stage I am at now.  Laying out the quilt is a puzzle: The pieces need to go from light to dark and no piece of fabric can touch another piece of the same color.

Below is a series of photos showing my thought progression through the layout process.  Apologies for the horrible lighting; there's only one spot in my apartment with enough floorspace to lay this out and I can't do much about the lighting there.
Here is iteration one. I noticed that even though I was using two different lavender fabrics, they look too similar when lined up adjacent to each other, so they needed to move so they weren't touching.

#2: lavender's still touching in one spot

#3: that block is far too dark for it's position

#4: I felt there were too many purples concentrated in this one area

#5: It feels like a dark horizontal strip; I wanted to break up that dark by moving some of those to the row below.

Current iteration. I am pretty happy about this.  There is a dark blue fabric touching the same fabric in the circled area, but I think it's so subtle that it's okay.
So what do you think? Any squares look out of place to you?  Looking at these miniaturized on the computer screen has really helped notice where the problem areas are.   I've really enjoyed working on these today and feel very productive :)

Sunday, December 9, 2012

SewCalGal Quilter's Christmas Party

Hi everyone! I am posting to participate in SewCalGal's virtual Quilter's Christmas Party, which benefits Operation Homefront.

She suggests quilters get together to share tips, insights, tutorials, or holiday traditions.  I thought I would share my latest Christmas finish and a little bit about gifting traditions in my family.

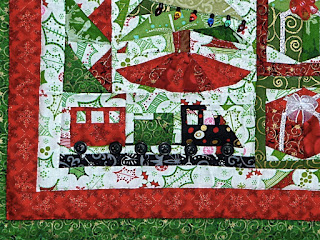
I just finished this little wallhanging last night. It is paper pieced (or foundation pieced, is there a difference?) with some fun embellishments. I really enjoyed putting it together and I definitely want to do more paper piecing in the future.

full wallhanging

The little train, now with wheels!

presents

Tree with its lights.

I really have very few Christmas decorations in my house because I have just started living on my own - this is my first year with my own Christmas tree! So I decided my goal will be to do one new decoration a year, no need to rush through making a bunch of things. Last year I made a chickadee wallhanging, which is more wintry than Christmas-specific, and this year I have this new wallhanging!

Here are some tips and insights I learned while making this wallhanging:

1. When paper piecing, save all of your trimmings. This wallhanging involved so many tiny pieces that I often dug through my trash can to find a leftover that I had trimmed off of a previous seam so as to not waste fabric.
2. Most people already do this, but definitely set up a little ironing station at your sewing machine so you don't have to get up to press every seam open. I had a little mini iron and mini ironing board handy for this purpose.
3. I wanted to put ribbons on the presents, but didn't want to go through the pain of stitching such tiny ribbon down.  I actually did stitch down such thin ribbon on a previous quilt and it was a HUGE pain.  I ended up finding this stuff:
 It is a very narrow band of fusible web, only 1/4" wide. It was perfect! I didn't have to sew down any of those ribbon pieces, this was quick and easy to apply, and appears to be bonded pretty strongly.

Here is an in-progress shot of fusing the ribbon on.
What I didn't think about was that metallic ribbon did not react too well to the steam from the iron, so each piece of ribbon shriveled a little when I ironed it. But not enough to be a real problem.

4. Quilting! You can't see it in the photos, but I used a holly design in the border. I really like the design because it's easy and doesn't involve travelling, so I wanted to share it with you.  It is based on Leah Day's "Prickly Holly" filler. I drew a little sketch to show how they can go in a  line for a nice border stitch:
5. Final quilting tip: If you haven't tried The Bottom Line thread by Superior, you really have to! It's awesome. I bought one grey spool as a tester and now use it in my bobbin thread for practically everything. I never have tension problems, the color blends in with everything and never shows on the top of the quilt, and I've actually had even fewer tensions problems with this thread than with using the same thread on top and bottom together! I am in love! On a side note, the Superior Threads website had tons of information for quilters. They have flowcharts for what type of thread to use for what purpose, and for every thread on their side they give suggestions for tension and needle settings. Oh, and their "Thread Therapy" instructional dvd is free for two more days.

Okay those are all of the tips in insights about my Christmas wallhanging. Hopefully you will find them helpful.  :)

I wanted to share a little background about gifts in my family. Growing up we always made handmade gifts for family. Every year, grandparents would get a homemade article of Christmas decor. Most of the photos of us working on them weren't taken with digital cameras, but I did find one on my computer:
This was a little paper pieced santa wallhanging, from sometime in high school.

Now that I'm grown up I'm carrying on the tradition of homemade gifts, but I figured everybody has a lifetime supply of Christmas decorations, so now for Christmas everybody gifts something they can use year-round. Two years ago it was little wine vests:

Last year it was chickadee wallhangings:
And this year I decided that I really hated making five of the same thing, so everybody is getting something a little bit different!

I would love to hear about your Christmas traditions, and don't forget to visit the other quilters on today's Quilter's Christmas Party. 

Wednesday, December 5, 2012

Tree wallhanging top finished

Yesterday I finished sewing together the top to my little Christmas wallhanging. Here it is!
 So many pieces! So fun! This had a ton of tiny pieces and was the most complex paper piecing I've ever done, but I totally loved it. My workspace had a cute mini cutting board, mini ironing board, and mini iron, all to make this mini wallhanging! It still needs all kinds of fun embellishments; I will get to those soon.

The white I chose for the background was quite busy, but I just loved that fabric. When it came time to do the borders, I auditioned a bunch for that inner border.  Here are all the combos I tried:

Stands out well, but this fabric wasn't actually used in the piece


I love this fabric but have yet to figure out how to use it in anything.


winner!

final combo

Now for the un-fun part: taking off all these teeny bits of tissue paper! I have some super pointy tweezers that I use.
Sooo much tissue paper!
 I'm especially proud of the cute little train. Here's a chapstick to show you how small the train is! It even has a little smokestack on the engine!


And here I sketched out a little plan for quilting the border. The squiggly lines will actually be holly leaves; they are very easy to stitch and don't require any traveling.


In the meantime I'm getting excited about my second Stairway to Cat Heaven quit.  Here are all my fabrics laid out. Yum!

For the past two days I've been washing them all in the sink because I'm too lazy to sew the raw edges to put into the wash.  Here's the worst offender, it had to be washed twice!
That water was like black!

And then my entire bathroom was taken over by fabric.  This picture doesn't even encompass all of the fabric that was in there, the door was blocking part of it and you can't see the ones hanging in the shower.
I'm getting pumped about this next project!

Saturday, December 1, 2012

A finish and a start

Things have been productive around here; I'm breezing through my 100 day hustle projects and feeling good about reducing my to-do list and UFOs.  It's feeling a lot less onerous to sew when I'm not panicking about getting a ton of projects done in a certain time period.

Here's the hustle progress:

1. Monthly Guild Project - Done through the Jan block
2. Jacket - bumped
3. Charity wholecloth - also bumped, but I did do a different charity top instead
4. Christmas presents. - Done
5. FMQ Challenge/placemats: All placemats are done.  I have 4 FMQ tutorials to go. Not sure if I'll complete these, they are feeling like a chore which is one reason I petered out back in July.  I know the goal is not to be a chore, but at the same time I want to push myself to work on these tutorials because that's the only way I'll get better.

As you can see, the only real thing left on my to-do list are those FMQ tutorials.

Anyways, last weekend I finished off the "O is for Owl" wallhanging from Patchwork Posse. I was intending to make it for halloween, but so it goes.

I originally attempted to combine the border and binding into a super-wide binding. But somehow the corner didn't have enough space. I'm not sure how I should have stitched it differently to give enough fabric gathered in the corners to fold over properly.
super-wide binding

really bad corners 
 It was easy enough to just put on a separate border and normal 1/4" binding. I think I mentioned in a previous post the trouble I had quilting it. I definitely used the "ultra hold" Heat 'n bond. My stitches kept skipping when I tried to stitch through it.  On the owls I was able to get by, but the tree branch ended up with really messy quilting as a result.

I followed the suggested quilting design very closely, but I added the star buttons on my own. I think they added some fun embellishment to it.

Here are some close-ups!


Little Owl
Big Owl
quilted moon and star buttons
quilted tree branch and leaves

Now that I have that UFO off my plate, I've started a little Christmas wallhanging.  I don't really have any Christmas decor right now, so I want to sort of add one decoration per year to get my collection built up.  This is a nice, tiny, paper-pieced wallhanging.
This pattern has sooooo many pieces!

 It is by far the most complicated paper piecing pattern I have ever done! It's definitely slow because each piece is a unique size so I can't mass cut them out in preparation. But I do really enjoy it. I am trying to do one chunk a day and I think I might be able to finish the wallhanging by the end of next week. I am having lots of fun in the meantime!

First three pieces done: tree, star, and tree skirt