Pages

Sunday, October 26, 2014

Frustrating Sewing Day

Today was supposed to be a super accomplished sewing day, but instead it ended up being one of those days where nothing got accomplished. Don't lie, I know you have those too!

I had decided to sit down and knock out this bear bargello quilt.

It was fun to make, but the honeymoon has worn off and I am off% ready to be done with it.

One reason I'm done with this quilt is that at some point, something went massively awry with the fusible web. I was using heat 'n bond, which I know is on the lower end of fusibles but I have used it many times before without incident. At some point, I have no idea when, why, or how, the fusible somehow stained the fabric. It's not too noticeable in my salmon because they are meant to look scaly. But its really obvious on this bear in particular because I only put a strip of fusible down to try to keep him soft.


See the shadow on his forehead? That's the fusible web. You can see it has imprinted some kind of grid pattern too. (sorry for the lint, ignore that!) Also all of the fused pieces are crazy stiff. I know heat n bond can be stiff, but this is a whole new level of stiffness. I am thinking that maybe all of this is related to it being expired fusible? I don't know if it actually is, but it certainly could be two years old at this point.

So anyways, ready to get this quilt the heck out of here!

Joann's had a big sale all week, so I went over there and purchased some crazy soft and comfy "ultra cuddle" fleece. My boyfriend has a ratty old blanket made of this material and he takes it everywhere he loves it so much. I will admit it is super soft stuff. But I've never sewn with it before so today was an adventure in getting to know this fabric!

First when I sewed the two chunks of the backing together, I didn't realize that the grains were going in the opposite direction for the two pieces. It is a velvety material so grain really matters. Then when attempted to resew it correctly, my thread would NOT stop breaking. I tried everything! I changed the needle, wound a new bobbin, rethreaded the machine, changed the foot, and finally took apart the machine and cleaned and oiled it. I'm not sure what worked but finally something seemed to click and the breakages ceased. (phew!)

So onto my porch for a little spray basting:

The advantage and disadvantage of this cuddle stuff is that it is really clingy. So it was easy to pull it nice and smooth for the basting but it also wrinkles really easily. We'll see how well it keeps its position during quilting.

Speaking of quilting, that was the next thing I tried. And then promptly stopped. Because every single stitch was bringing up pilled backing fluff.


So if you have any tips on that, let me know. For now I guess I am setting it aside and returned to plugging away at my skill builder BOM. I am still a number of blocks behind, but this week made progress on the book shelf block:


I have started to just do my own thing on this quilt. This block was supposed to be made with a glueing technique that I despised, so I just pieced it following a tutorial here. I guess I am more set in my ways than I thought because I have not wanted to use a lot of the new skills that are being taught in this skill builder!

Okay one last thing I accomplished this week, to end on a high note.

I have taken up jogging, even though I hate it, because it's good exercise and a great time to chat with my boyfriend and a great way to get to know our neighborhood. Just this week we found out that the high school less than a block away from us is actually a combined middle and high school! We learned this by jogging over there and jogging around their track for a bit.

Anyways, my little ipod has no clip and my shorts have no pocket. So in anticipation of a 5k race on Saturday, I modified my shorts with this little ipod holder.


 It took about two second to make with some scrap fabric, and it working like a charm at holding my ipod during the race. Woohoo!


Saturday, October 18, 2014

Project Progress

Well I am pleased to say that my veggie quilt is done and off to it's new home at my parent's house!

And yes, I am making the world's worst face in this photo. The sun was too darn bright.

Here is my dad enjoying the quilt in Alaska. The perfect size for snuggling under in front of the tv!


Before I gave it to him, I ran it through the wash to get all of the glue that I used in the appliques out. I was sure to add three sheets of color catchers, but when I went to move the quilt to the dryer, my boyfriend asked, "Why did you add all of these fabric softeners?" Oops. Luckily all of my fabric had been prewashed so no bleeding occurred. 

I'm a recent convert to washing my quilts before I give them away. I read on a blog someone who was worried about things coming apart or bleeding in quilts she gave away, but she wanted the new owners to know the quilts were washable, but also to let her know if they had a problem in the wash. The best way around this is to wash it yourself! That way any washing disasters can occur BEFORE you give the quilt away. So that's what I've been trying lately.

Well now that my veggie quilt is out of the way, it's been time to tackle some other UFOs. 


My Celtic Solstice is ready to be quilted but stuck in the corner until my stencils arrive. Unfortunately they were mailed to California instead of to my new home in Missouri, and I haven't been able to get the stencil company to respond to my requests to re-mail them to the correct address.

Now last weekend my guild hosted our first big retreat, "Sew Me St. Louis." As usual, I have no photos. But it was a blast.


Here is all my stuff packed to go. I brought waaaaay too much, but I didn't want to run out of things to do. Everyone in the group brought projects they didn't want to work on, but had to. Being stuck in a room with a sewing machine is a great way to finish up those projects that have been dragging on. We were joking about trading projects because nobody liked the one they were working on.

The first thing I tackled was this bargello. It only needed a tiny bit of satin stitching, and now it is DONE! Quilting will come after Celtic Solstice is complete.


Then I worked on a few Christmas projects, managed to sew through my finger (yep), and got down to business with my Skill Builder BOM. I've fallen behind on this project (and I think I haven't even shared all my block finishes on here) but I am bound and determined to get it done by the end of the year. I don't want this project to drag on!

Here are the three blocks I completed over the weekend:

This is supposed to be spools of ribbon, FYI


All three of these were supposed to be completed with some kind of gluing technique, but after I tried it on the rotary cutter I determined that it was absolutely not my cup of tea and I used fusible web on the others.

In fabric news, I am working on my fabric choices for Grand Illusion:


I think I have the pinks down pat, although the color card is a little more salmon/coral than my pinks. I bought a lovely yellow that I think matches perfectly. But I am short on teals and as you can see, my greens are rather dark. I am debating if I want to go with the dark greens or go buy some lighter shades.

I am very excited because my mom will be participating this year with me! Working on a quilt is way more fun when there are others to work with. That's one reason I enjoyed the retreat so much, just being able to sit and chat with others about the problems we were facing on our quilts, to swap ideas and advice, was tons of fun!

Here are my mom's fabrics so far:

So bright and cheery!


Finally, my lovely monthly fabric bundle came in the mail yesterday. GORGEOUS, as always.


Do you do any monthly fabric clubs? I am loving this one, but realistically I haven't used many of the fabrics yet. They are fun and modern but for example they don't work well with a mystery like Grand illusion where the pattern should be subtle and color is most important. So I can't decide whether I should continue this club next year. But I really love receiving these, I look forward to them every month and it is a total delight when they arrive. So...what's your vote on whether I should continue?

Thursday, October 9, 2014

Bonnie's New Mystery!!!

You guys. YOU GUYS!! Bonnie Hunter has posted the intro to her newest mystery quilt. I had an absolute blast and a half making Celtic Solstice last year and I CAN'T WAIT to do this year's!!!

I love Bonnie's quilts because they always look gorgeous. I know when I do her mystery quilt that I will love the outcome. Plus she always has such amazing technique tips...and all those small pieces really challenge me to get better at precision piecing.

Grand Illusion

Speaking of Bonnie's mystery, right now I am working on finishing Celtic Solstice! My goal was to complete it before her next mystery starts. The first clue doesn't go out until November 28 so I should be good. Here is my sandwich being put together last night.


This time I tried spray basting. We shall see how it works. To be safe I am stitching securing stitches in wash-away thread.  The batting is wool. I have never used wool before but I am quite excited about it. It seems quite soft and fluffy! Also this thing is a true behemoth. The biggest quilt I have ever made, literally. I'm basically in a wrestling match with it at the machine. I'll let you know how it goes!


Here our newest foster kitty, Rosie, models on the quilt. She is a real sweetie, she has been keeping me lots of company in the sewing room. :)

Monday, September 22, 2014

Veggie Quilt is Quilted!

Every time I sit down to quilt a quilt, I decide that I hate machine quilting. I'm not quite sure why, but part of it is that I find it super intimidating to choose a pattern. So many quiltmakers are able to create complete secondary designs with their quilting. It's something I would like to do but my brain isn't there yet in terms of being able to visualize what I should do.  But after three weeks and a lot of angst I have a quilted quilt!
If you are thinking that you can't see the quilting at all....yep. More on that in a bit.

So when it came time to quilt I spent about half day just looking up ideas online. I was trying to find fillers for behind the applique that wouldn't be too dense but would also fit into all kinds of weird shapes and sizes. I took my old paper applique templates and doodled patterns all over them. I went to the library and got quilting books. I scoured pinterest.


 Even though I knew it would be really hard to stitch on a machine, I auditioned this crosshatch...it just looked bland and sterile. I really thought it would be cooler! Maybe it has a bit more flare when stitched.


After about four hours of this my brain was fried and I was just like "I'll make them all different!" This way I didn't have to decide on a design. So all nine applique blocks have a different filler behind them. It was a good compromise because some blocks have a lot of wide open space and others have many itty bitty nooks and crannies, so I could pick the right pattern for each one. It does make the top a little less unified though.

Miss Pepper was there to lend emotional support. 

And by this point it was late in the day and the quilt shops were closed. I have been very disappointed with the thread options at my nearest shops (one only sells 60 wt or 30 wt...what??) and didn't feel like driving 20 minutes...so in sum, I just went with whatever threads I already had. Which meant monofilament for the top because I didn't actually have any colors that matched the top.

Now the mono is certainly easy, but the disadvantage is that I did kinda work hard on this quilt and all of the quilting is pretty much invisible. The only consolation is I chose a big fat 30 wt for the back so the quilting stitches actually look quite lovely on the backing!

So I started stitch away and the needle was just bouncing and making a weird noise, although the stitches looked ok. I thought maybe I needed a new needle and finally stopped the machine. To my horror I discovered the throatplate had come loose! And when I pulled it off, I discovered all this underneath!


Eek!


That's all the lint I managed to extract. Now I DO keep my machine in good repair, but you can tell look at it that this lint is all from the fleece. And I had only just started the quilting! (Come to think of it, now that the quilting's done I should probably give the machine another cleaning!)

Generally I didn't do any marking, but for these triangles I didn't trust myself. I tend to quilt far more densely than I should. This time, I found a design online, resized it to the right shape, printed it, stitched through it with no thread, and then used the perforated paper as a stencil. I got to use my quilter's pounce for the first time! It is basically a chalk filled eraser-looking thing that you rub over stencils and it leaves nice chalk lines. And it did a great job here! Below you can see the lines and then the final stitched leaves.


So without further ado, here are some random close-ups of the quilting. It was rather hard to photograph due to the invisible thread...

I managed to do pretty well at keeping the wrinkles away everywhere except the border. It was interesting how the ease of stitching changed with the fabric (there are 6 different fabrics in this thin strip border). This dark green was especially wrinkly, while the batiks were super smooth. 

This cat literally runs over whenever she sees me taking photos! This was supposed to be an elongated spiral but it came out looking kind of identical to the woodgrain I did on another block.


Here's the back of the corner square. I liked how this came out with the curves to counteract all of the angles.


Here's the backside of the cabbage block, with spirals!

And the back of one of those triangle units I showed before.

Well that's it for now, I have just bought the binding and hope to have this quilt finally finished very soon!


Monday, September 1, 2014

Getting back into quilting with a big finish!

Moving homes took a lot more time than I anticipated, and it's only in the past few weeks that I have unpacked my sewing supplies and slowly eased back into quilting.  Here is the new sewing room:


Already cluttered, I know. I probably should have taken a photo before I started work! Do you see kitty lounging under the sewing table?

I am becoming a big fan of this space for many reasons. First off, it doubles as my boyfriend's study room.

At first I wasn't too thrilled about sharing my space, but now I really like it. I was originally worried about having my sewing area separate from the general hang-out area since I don't like to feel antisocial when I sew. This way, I can sew, he can study, and we can spend time together!

It's also really nice that there is no tv in this room. We're one of those houses where the tv seems always on in the background whether anyone is watching it or not. Having a nice, quiet, tv-free space for working keeps my distraction level down. 

So, as I mentioned, I've been easing back into sewing, first and foremost with my veggie quilt, which had the border already pieced and ready to go before we moved. After a week of plugging away at piecing the final inner and outer borders...we're all done!

BTW Mr. Photographer still has a lot to learn about quilt photography...sorry for all the weird slants and angles in these photos!! The finished quilt is around 60x60, a nice large lap size. One thing that gave me a big headache this past week was figuring out those diagonal lines that travel through the inner and outer borders. I'm not sure it comes through, but those diagonal stripes are supposed to correspond to the colors of the diamonds in the middle border.  Unfortunately the diamond color changes don't correspond with the row lines in the main quilt, and I think it looks  bit disjointed that the inner border doesn't meet the main quilt at seam lines. Oh well. 

I learned from this quilt that working without a pattern, at least when it comes to piecing, is not for me. I can figure out the math but it just takes me a long time and causes a lot of anxiety that I'm doing it wrong. So for the forseeable future...patterns only! It will be such a relief to have some instructions after trying to do everything on my own for this quilt.

And I realized I've never shown close-ups of all the blocks, so here they are! These are all hand appliquéd with embroidery. We took the photos in the sun so they all came out a little washed out.

Bell pepper:


Broccoli:


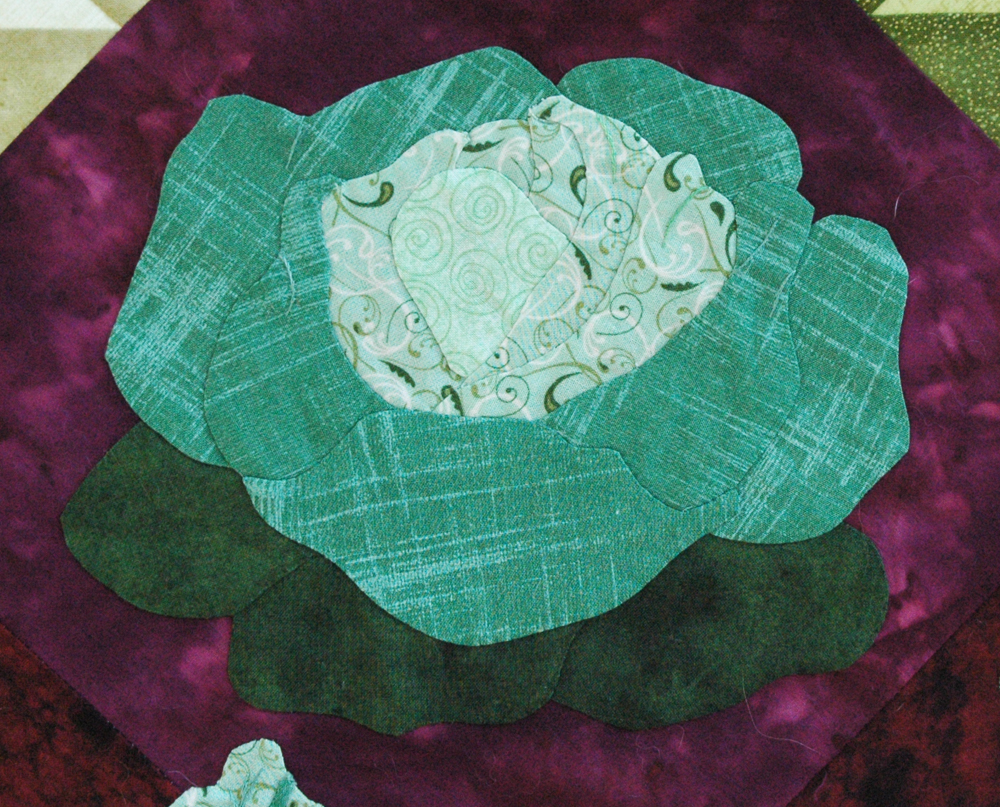
Cabbage/lettuce:


Carrots:


Red onion:
 

Peas:


Squash/zucchini:

Tomato:


 And finally, the Larry's Garden sign! This is a real sign in front of my dad's garden.


And that's all for now! I'm off to attempt to baste this thing and start quilting!

Thursday, July 17, 2014

Challenge quilt complete

Well I finally wrapped up my Michael Miller challenge quilt in the nick of time and...it came in second at my guild meeting!!!


Here is our pretty glamour shot. So many people came up to me and said they loved the kitty. This is great because I have really been wanting to do more realistic animals/plants/portraits in quilts. I have bought numerous books on this topic and it's great to know I'm headed in the right direction. I can't wait to make more.


Overall this quilt was a real challenge for me. On the quilting, I decided to not rip out all my work but instead just rip out a few of of worst bulges and smooth them over. While it's still not very good, it's at least passable when you look at it from afar (someone at the meeting asked me if I had used a longarm! Hah!) 

Of course the troubles didn't end with the quilting. I went to iron out my frixion pen markings, set the iron on a really low setting, but it wasn't hot enough. So I cranked up the heat and out of nowhere the iron got gunk all over and stained my top!


I thought I had melted the mono thread but after talking to many other quilters I do not believe that was the case. I am honestly unsure what caused this. Perhaps some rogue fusible web or spray baste?


There's a shot of the stain. As you can see, it somewhat blended in with the grey of the background! It turns out a tide pen worked to get rid of it. (How DO those things work???) More disappointing, I forgot I was using a scrap of polyester batting and the heat from my iron permanently flattened the center area. I love the loft of polyester but it's too hard to try to remember not to iron it!
But in the end it all turned out alright...or at least well enough. I learned a lot of lessons from this challenge I am glad I participated.

In other news, my sewing area, which used to look like this...

...now looks like this!


We have become proud first-time homeowners and are currently in the moving process.


Wish us luck! I get an entire bedroom to myself for sewing! It's the second story window you see in the upper corner of this pic :)