Pages

Tuesday, September 8, 2015

Works in Progress: September Edition

Yeesh, my last update was over two months ago! What's been going on since then?

Well, at the end of July I went to Madagascar.
Not a lot of sewing occurred in July because I was so busy packing and repacking and overthinking my packing for Mada!

I spent a lot time prepping hand sewing pieces to bring on the trip. Here's my little kit:

Just a nice zipper pouch, keeps everything neat and tidy.

Inside:


Is it organized? No. Does it pack flat? Yes. This thing zips up nice and tiny, just how I like it.  What I am working on? Easter eggs!

Here's a batch I just finished this past weekend, while on a road trip:

I've tried EPP, and it's not for me. But this wool embroidery is a blast, and it's a frivolous little project that I am just doing for the joy of it.

Here's the only egg I've finished so far:


Well anyways, after all that prep work I didn't do any embroidery in Madagascar. My scissors, while safe by American standards, were confiscated by security at Tana airport. Oh well. 

I did bring some cool souvenirs home. These are hand embroidered tablecloths. They were clearly designed just for tourists, but I really liked them!


Once I returned from Mada, I got the very exciting news that I will be TEACHING my first quilting class EVER!! It will be on applique techniques, and will be taught at our guild retreat. I am SUPER excited but also SUPER nervous. So much of August has been me reading up on applique methods, checking out every applique book the library has, writing up a lesson plan, and then re-writing it, and so on.

Here's the class sample:

Ok, I admit I machine appliqued the whole thing because I was in a rush, but in the class we are going to learn both machine and hand applique techniques.


I was originally going to provide 20 cactus patterns and let everybody pick their own, but after a lot of internal debate I decided it would be a lot less confusing for everyone if we were all working on the same design. So, by executive decision, we are all making the one on the right with the pink flower on top.


The hardest thing has been figuring out what to include. I only have three hours, which is very, very little time to cover the million applique techniques that I wanted to go through. I was originally going to show everyone how to make their own patterns and have them do it with me, but I've decided to just tell them how I made the pattern and show them the steps, but not have them try to do them themselves. And I was going to cover three applique techniuqes but I worry we will even have time for that. We might have to stick to only two techniques. I'm just going to wing it!

Here are a bunch of sample blocks. A lot are from a past applique class I took, but I made some new ones too. I wrote on the back either the hand applique method or the brand of fusible web. I still need to go sew down the edges of the fusible web ones; I'm going to do a different edge finishing technique on each.


Oh AND I want to write up handouts with all of these tips and tricks because I know it will be too much to absorb and remember on the spot. And I want a handout comparing fusible webs but it's proving hard because I only use one brand and am not too familiar with others (although I found a surprising number of samples of different brands tucked into my drawers).

Well anyways, that's been a lot of excitement. But let's check in on all of those other sewing projects.

This lump is a quilt. It's been waiting for me to finish the binding for months now. It sits patiently by the tv.

But it's competing with this:


My first 2000 piece puzzle! And man, do I love puzzles. So whenever I sit in front of the tv, it's like "hmm, I could sew on a binding, OR...I could PUZZLE!" So the puzzle always wins.

Upstairs, we've got lots more mostly finished quilts.
This is my Bonnie Hunter mystery, Grand Illusion. Top is all done, I have purchased the backing and batting, just need to sit down and quilt it.


But wait! there's another quilt on the machine right now! Remember this Christmas quilt?

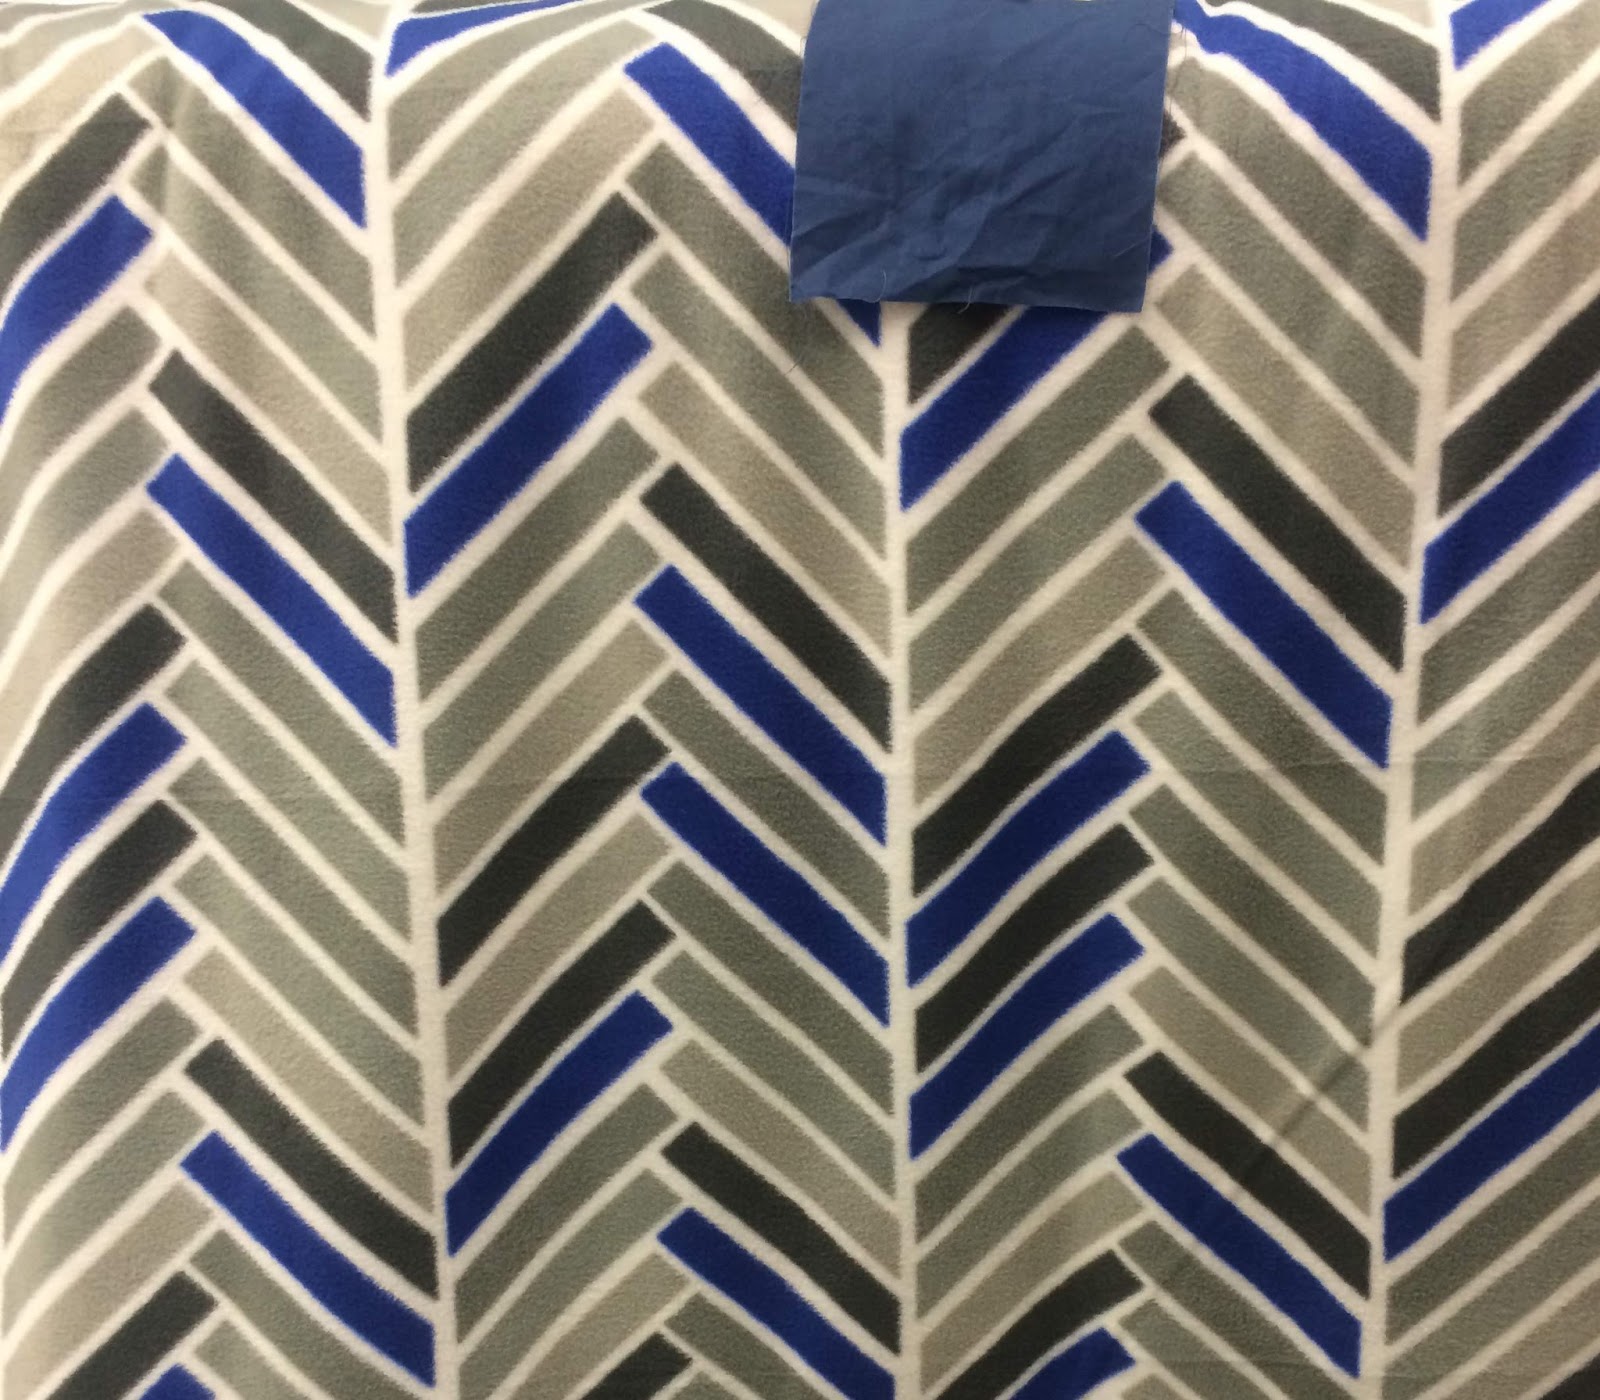
I finished a looong time ago (ok, like Feb or March), but I waited patiently for Joann's to get their Christmas fabric in stock before I finished it. And was it worth the wait! Check out this backing:


Nice soft fleece, adorable Christmas mugs, and the blue is the exact same shade of blue that's on the front! It really is perfect.

I was supposed to hand embroider on some steam, but I couched it. It was tough, came out a little lumpy. But still, a cool effect.


And here's Miss Pepper getting in the way right when I was about to start basting.


Ok but what other projects are currently in progress?

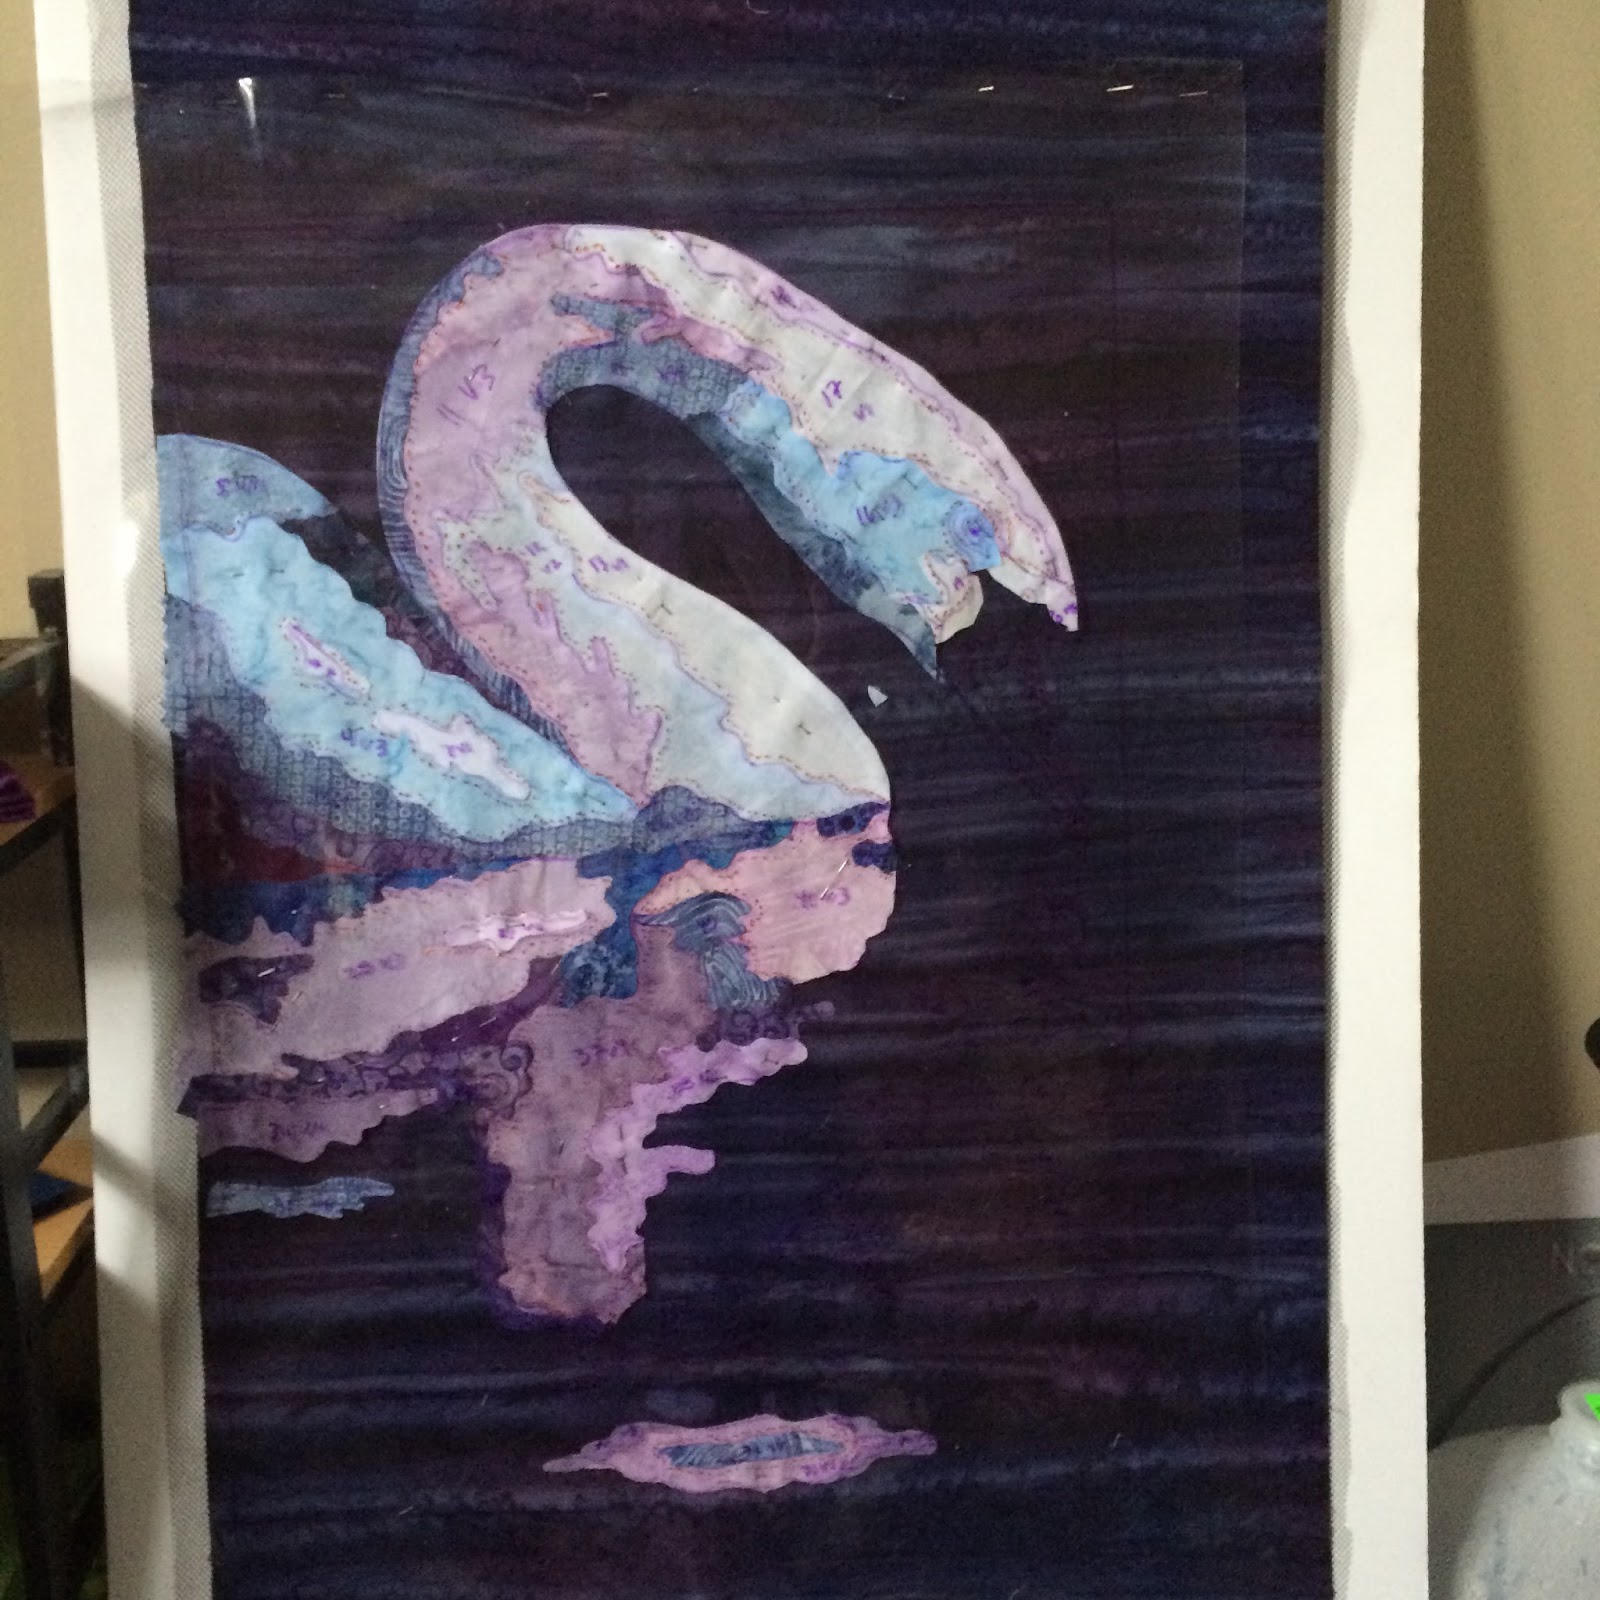
Remember Mr. Swan? He's hidden behind a stack of stuff. Not a good sign. It might be awhile before he's finished.


Oooh what's this pile? On the left we have a giant stack of lambas, fabric worn by ladies in Madagascar. I bought a ton because they were about a buck each, but I haven't sorted them and don't really know what to do with them. And on the right, sweatshirt fabric for a Craftsy class I'm taking on sewing with knits. Yes, I'm using Craftsy! I think it's funny because I resisted for a looooong time but I suddenly became obsessed and bought four classes in the past week. I'll definitely share reviews as I finish each of them!


Ugh here's another to-do rack. That top stack is for a bee block from May (eek), in the middle is a tote bag that I've cut the pieces for, and on the bottom are some size XL jerseys that I inherited and need to take in to a size M. Oh and change the name...


 And here's the fun stack! This weekend I am taking TWO(!) workshops from Elizabeth Hartman! I already have all of my fabrics picked out and ready to go. Woohoo!


Ok I think the puzzle is calling my name...

Wednesday, July 1, 2015

Works in Progress

So lately I keep waiting until things are done to show them off, but this is a work in progress post! I've got a couple of different things in the works right now, all are small, fun projects.

First off, I'm almost done with this Pacific Crest quilt from the book Beyond Neutral.


I originally bought the fat quarter bundle for geofabulous because I loved it, but I had no idea how to use fabrics with such big, bold designs. This pattern showcases them well and came together very quickly.

I even got to take advantage of the spring weather and do some of the cutting for the project on my deck.


And of course, must show Ms. Pepper showing off.

Oh, here's one more shot of the quilt top in better lighting, except it turned out I was holding it sideways!


This is definitely a perfect couch quilt, so I went with fleece on the back.
Here are the different fleeces I tried out:


None had quite the right shade of blue, but they all had very cool geometric patterns. I ended up choosing the chevrons because they exactly matched the shapes on the front of the quilt. And it came in extra wide so I wouldn't need to patch any pieces together for the backing!

I decided to go super basic on the quilting, partially because I am fairly sure I do not want to keep it for myself. I just did diagonal lines every 5" or so.


Currently the quilt is mostly done, it's just waiting for me to sew down the last bit of binding.

I am either going to donate it or sell it. I know a lot of people opt to donate because selling is a pain and you only get a pittance. I did a search on Etsy for quilts and the prices are really pathetic. No one could possibly make a living for that...there were custom queen quilts for $200. What?! That doesn't even cover cost of materials!

But here's the thing: I spend a lot of money on my quilting hobby, and it would sure be nice to not be in the hole quite so badly. If I could break even on this quilt I would be happy. I calculated that I spent about $100 for materials so I'm thinking of pricing it at $250. I kind of think I will put it on Etsy and see if it gets any interest, and if there isn't any after a set amount of time, I will just donate it. I don't hold out a lot of hope because I don't have any previous sales (and thus reviews, proven track record, etc), so someone would be making a big leap buying my quilt. But you don't know until you try.

And yes, I've read about the "We Are $ew Worth It" campaign and I hope you have too. It's a great campaign. But you can't simply ignore market conditions. I could say my quilt is worth $1,000 but if nobody is willing to pay that amount for it, it's not actually worth that much. Economic principles play a role here. 

And of course it won't go on sale if I don't finish it...the binding has been 75% sewn on for at least two weeks now! And then I got distracted by this project...


More on this soon!


Thursday, May 28, 2015

Creative Fun

This week I've been too sick to do any quilting (boo...) so instead I'm finally getting around to sharing a "fun side project" I worked on about a month ago. I'm also finally linking up with QuiltShopGal's #CreativeGoodness Linky Party!

I think creativity is a really important part of the quilting process, and we all need to find what level of creativity makes us happy. After all of the anxiety and stress I felt making my dad's veggie quilt, which entailed a relatively minor amount of creativity in plotting out the setting and design, I know that working from patterns is definitely my strong suit and where I feel happiest.

There is one exception, though, and it is landscape quilts. I love making them and they really get my creative juices flowing (and yes, I know I have made very few, but I plan to make more!)

So with that in mind, the backstory to this project is that we were creating pages for our college reunion "class book." I wanted to do something unique and brainstormed ways to incorporate quilting into my page. Of course I'm not the world's greatest quilter. But then it came to me..applique! I love fusible web applique because you can literally make anything with it.

And for some reason something else hit me...snowglobes! I love snowglobes and collect them from most places I visit. I wish I could show you a photo of my vast snowglobe collection, but most of it is in Alaska. I am starting to amass a new collection here though, with seven accumulated so far.

Making a snowglobe quilt has been on my bucket list, and still is. I want to make a quilt that is a bookcase full of snowglobes, and each snowglobe exemplifies part of my life. So this was kind of a mini/dry run version of that.

First off, I took a look at my Stanford snowglobe, and sketched out a mockup.

And then...we were off!


Here's the Stanford snowglobe:


Next off, I wanted to show something about moving to St. Louis and working as an engineer.


The snowglobe was supposed to have little engineer-y things around the bottom, but my boyfriend said the hard hat looked like a lemon and someone else said they thought it was a turtle, so I gave up on that idea.


I wanted the arch to be all sparkly, and I originally tried to use elmer's glue and regular old glitter. Well the glue just wouldn't dry and the glitter came off all over my hands. What I used instead, which worked really well, was glitter fabric paint that I bought while playing around with my last landscape quilt. I think it gives the arch some pop, don't you?
(Do you see the little piece of loose thread? Oh well...)

Then I decided to do a hockey snowglobe, as I play recreational hockey. I actually have two hockey snowglobes in my collection right now.

One is from the San Francisco Bulls inaugural season, which I just learned went bust. It's a bit of a shame because I had a lot of fun at their games, but I think they had a tough location because their stadium (cow palace) was not easily accessible from public transit. The other snowglobe is from the NHL Winter classic that my boyfriend and I went to two years ago. Here we are enjoying the snow:

For this one, I had to decide how much detail to go into, and what to make myself vs. get pre-printed on a novelty fabric. I also debated a lot what to show. Should there be skaters? Just skating equipment? In the end I chose something relatively simple. I bought a novelty fabric with hockey skates but decided it looked too out of place, and copied the skate design to make my own little pair.

Here's the net being made. Lots of tiny pieces!


Finally, of COURSE I had to have a snowglobe for quilting! For this one, I did just go with pre-printed novelty fabrics. It's a fun and easy way to get the design you are going for without working your tail off. This one also showcases all the cat rescue work I do.

And those are my four snowglobes! I took photos of them and arranged them on a pdf page with captions for my class book submission.

I did want to share one bit of advice from this. I normally use Heat N Bond Lite or Heat N Bond Ultrahold. For this project I bought some Pellon Wonder Under and was very disappointed. The web would constantly stick to the paper instead of the fabric, and when I tried to remove the paper it would often fray my fabric edges and sometimes rip off very small pieces (like kitty tails). I understand it is softer than Heat N Bond, and may be better for quilts that will be used, but for wall projects where stiffness doesn't matter, I will be sticking with Heat N Bond from now on.

This project was a TON of fun. I have no plans for these snowglobes and have set them aside. Their final purpose does not matter so much as the joy I got from making them. Another great joy was pulling from my stash and discovering all of the fun fabrics I have! I would audition fabrics and then throw them all over the floor. Rosie greatly enjoyed rolling around in the mess. :)


And I think that's what quilting is about, finding what makes you happy, what gets you excited, and going for it!


For more inspiration, check out the other linky participants of the #CreativeGoodness linky party.

Sunday, May 17, 2015

Professional Tote

Today I have something pretty cool to share...the professional tote!


The pattern, made by the Creative Thimble, can be found here. The pattern for this tote was one of the many goodies I brought home from Paducah. The great joy of not having a current big intimidating quilt in progress is that this year I was actually able to dive right into my Paducah projects while I was still excited about them! (I'm pretty sure I still haven't made any of the patterns I brought home from Paducah last year...)


When I saw the samples at Paducah, I was blown away by how, well, professional this bag looked! It could easily be mistaken for something storebought. And I had just been thinking that I really needed a new tote for myself, so this fit the bill perfectly.


In the center, with the blue zipper, is a laptop sleeve. You can also see a little key fob on one interior pocket. There are interior pockets on both sides, one has a velcro enclosure.
On the outside, this side pocket has a magnetic snap to keep it secure. On the other  side (shown below) there is a small zipper pocket with another pocket behind.


On each edge we have water bottle pockets that can cinch up.


And of course the top zips shut too, for added security! So basically this is the world's most useful tote bag :P

Ah...one more aspect that really made it seem "professional"...the bottom! The bottom is made of a nice sturdy canvas, and I added purse feet to it to keep it clean.  A number of the samples the creator had sewn up had faux leather bases...it made them look so cool!


When I was picking my colors, I really wanted something that could pass as storebought, so I chose pretty mellow colors for my regular taste. I actually bought both the grey and pink fabrics at Hancock's of Paducah, thinking they could go together. And go together they do! I love that it's a demure grey but has those pops of bright magenta. :)


At the booth in Paducah, the husband of the pattern author mentioned how many times he hears that her patterns are well written and easy to follow, and I have to agree. Sewing anything that isn't a quilt is NOT my strong suit. These instructions were great though, and I only had to rip things out a few times (mostly because I didn't read closely enough).

One aspect of the instructions that I loved was the inclusion of pre-printed labels to apply to your pieces.


You can see all of my pieces cut, fused, and labeled here. Oh, I must mention the interfacing too. Per the pattern recommendation, I used Pellon decor bond. I am really impressed. It was super easy to sew through and work with, but the finished tote is nicely stiff and sturdy.


She has many other cool purse and tote patterns too, so I see many more pattern purchases from the Creative Thimble in the future!


As a side note, Rosie was being a total obstructionist during the construction of this tote!


Saturday, May 9, 2015

fun finish

I've got so much to post about but no time to post! The photos on my computer have been in disarray for months, and it's making it tough to blog. I'm trying to get them organized a little bit at a time.

In the meantime, here's a top I just finished. 
I don't think I ever even posted about it being in progress.

Yes, it's a Christmas quilt! This was a free pattern from Kate Spain called "In from the Cold." You can still find it. It immediately caught my eye because free patterns that show off fabric lines are usually pretty lame. But this one is so fun and unique!

The pattern sat around in my head until last summer when I found a Christmas fabric bundle on sale at my LQS.

I cut out the pieces and worked slowly, one mug at a time, whenever I was feeling overwhelmed by my other projects. I can't recommend enough this method of having a "fun" side project to default to when the others tire you out.

Here are some close-ups of some of the fanciers mugs:


Aaaaand that's all I've got today. I am in between large quilt projects and loving it. I am working on little odds and ends that I picked up in Paducah (a really cool tote bag, some wool easter eggs, wallhangings), and finishing off random UFOs (my bee block quilt, another tote, some wallhangings). It's fun to walk into my sewing room and say "what do I feel like working on today?" I hope you are enjoying whatever projects you are working on too!