Pages

Sunday, November 3, 2013

Veggie Applique Blocks

This week I went back to my veggie quilt and worked on my hand applique blocks. I finished two more:

Bell Peppers


...and tomatoes!

Apologies for the colors, my camera is doing something funky with oversaturating reds and I don't know why!

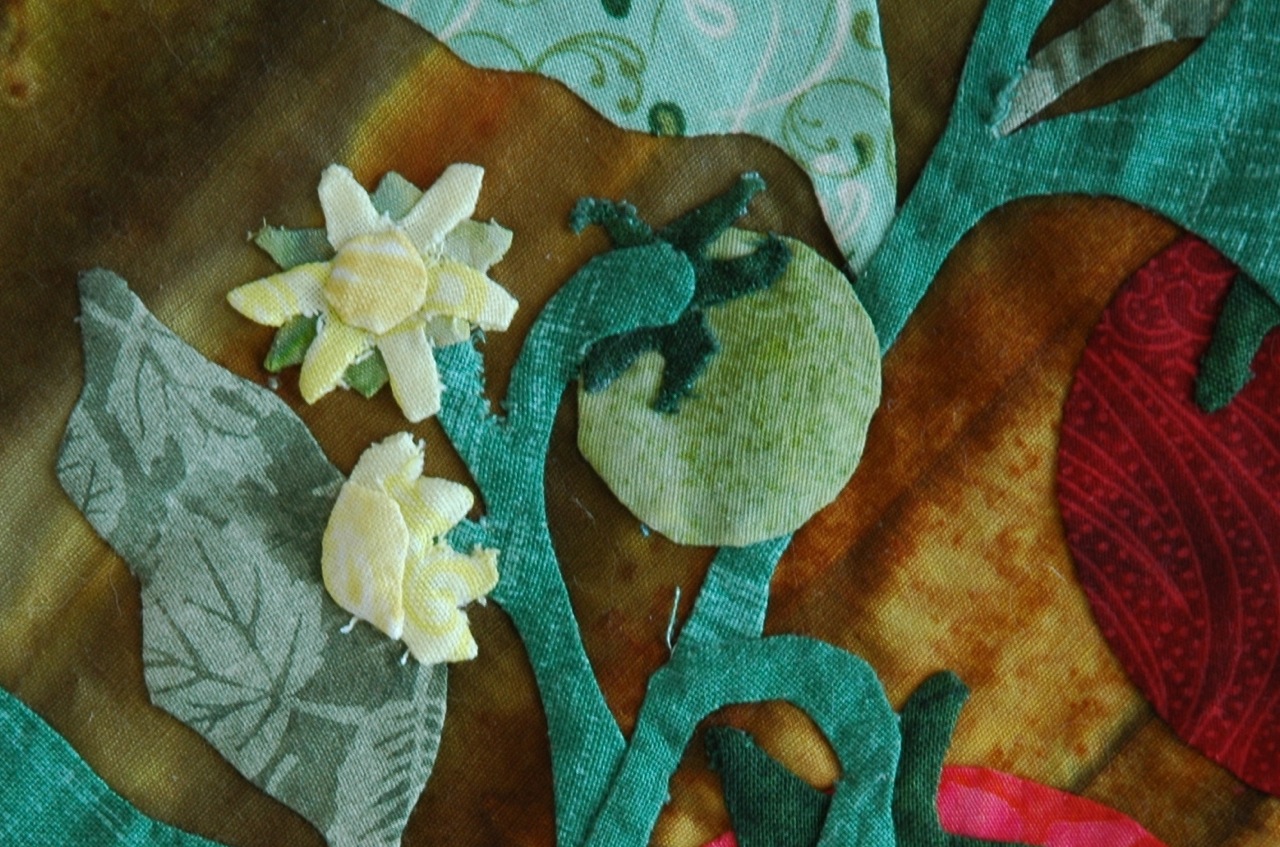
The parts I still struggle with are points and narrow pieces.  I just haven't figured out how to get the raw edges under when there is so little raw edge available in these narrow spots.


Here is a zoom of the flowers. See all those raw bits of fabric poking out? I don't have a good solution.

I have signed up for a hand applique class at my local quilt shop.  I am hoping to bring these blocks in and get some tips and advice!

Next up is the cauliflower block. I am trying something different and assembling some of the pieces to each other before I put them on the background. I am also trying glue basting instead of pin basting on this next block. So far, I am a fan!

Sunday, October 27, 2013

Christmas Projects

I have spent this week working away on Christmas projects. I can't show you any, but they are really cool and I am very happy with the outcome.

Here are some of the supplies for one of them:

Aren't the colors pretty? You might recognize the labels as coming from Joann's.  They had a great sale all week  - $1 fat quarters. I bought a bunch, I couldn't help it.  Their fabric is definitely low quality and I would never use it in a quilt, but for sewing and craft projects it seems to work fine.

HOWEVER, Joann's has the horrible habit of putting those "fabric quarters" stickers directly onto the fabric! (WHYYYYYY?) So, I have a bunch of fat quarters with sticker residue on them because the stickers never come off cleanly.  Anyone have suggestions for how to get the sticker remnants off of my fabric?

In other news, I recovered my ironing board!


This fabric is linen and is from the line "field study." I have admired it for some time but never bought any because I didn't know what the heck to do with linen. Then another blog I follow (I have forgotten who) made an ironing board cover from this fabric, and I was inspired to do the same.  

There are a lot of tutorials online for how to make one of these, and this was incredibly easy! I bought a bath towel, trimmed it to match the top of the board, and put it under the fabric as batting. Then I sewed a tube made from old binding strips around the edge of the fabric (also loosely trimmed to the shape of the board), put some yarn in it, and drew it tight like a drawstring. DONE!

I have to admit, having fabric this bright is a teeny bit distracting when I am ironing, but it's so pretty I am sure I will get used to it.  Plus I left the old cover on underneath so if I want to go back to bland beige I can just pop this cover off.

As a side note, I recently became unemployed. It sucks, but I am sure glad I have a hobby. I don't know what everyone else who is unemployed does all day. You can only look at job boards for so long. Having sewing projects to work gives me goals to accomplish each day and makes me feel productive. I try to switch between a bit of job searching and a bit of sewing throughout the day. All this extra sewing time is enabling me to get a lot more done than I otherwise would have (I wasn't even going to sew Christmas presents this year because I didn't feel I had time or inspiration...) Once these presents are done, I am hoping to tackle a bunch of UFOs and get them off of my plate so I can have a clean, fresh sewing start to 2014.


Tuesday, October 22, 2013

Time With Friends

Last week I spent visiting an old friend that I have known since elementary school.

Here we are as kids:

And here we are last week!


Things haven't changed a bit!

On the last day I was visiting her, she casually whipped out a seriously antique sewing machine and asked if I could make it run. (Answer: "Um heck yes!") She says it belonged to her great grandmother. It definitely seems old but uses electricity so also can't be too old.  I'm thinking 40's? 30's?


Anyways, we got it up and running pretty quickly. Instead of foot pedal it has a knee pedal. The only tricky thing I was unable to figure out is how to stitch backwards.  The instruction manual doesn't mention anything about it, and when I tried to manually twist the wheel backwards it cause a huge thread tangle. So I'm thinking it just doesn't stitch backwards at all.
Getting some help as I work out the kinks. He was very excited to be in charge of the knee pedal.

Reading the instruction manual and threading the bobbin


Here is the million dollar question: my friend doesn't know how to sew, but I want her to use the machine and not just put it back on a shelf, especially since I got it running and all threaded up for her.  Is there an incredibly simple and easy sewing project that involves only straight lines I can recommend she do? She wants to make a t-shirt quilt but I'm thinking something even smaller than a quilt.  Maybe I will suggest a pillowcase, those are super simple.  I just hope this machine gets used now that it works!

Wednesday, October 9, 2013

Layer Cake Bargello

I thought I would take a break from hand applique and work a little on reducing my number of UFOs. The first one I pulled out was my layer cake bargello.

Previously I had stitched 10" strips together in color order, to create large 40" x 10" rainbow strips.

I cut my fabric into strips, organized here by their width.


I don't have a design wall so I draped them in order on the back of my couch. Of course, kitty had to help.


See her in the back corner of this photo?


Here is the whole thing stitched together. I took a page from Leah Day and stuck it up on the wall for a while so I can ponder how to finish it.


I really like quilts that take a standard pattern and add some interesting applique to the front. Here are some examples.
Seen at Quilting in the Garden 2012

Seen at Quilting by the Bay 2012

Seen at the Sisters Quilt Show 2013

Seen at the Sisters Quilt Show 2013

Seen at Sisters Quilt Show 2013

I want mine to look like these, somehow.  I need to figure out what shapes I even want to applique on top, and what color. Plus, since this was a layer cake, I am out of fabric, so I need to purchase more (once I get a plan!)

Next project: Whipping up Christmas gifts! Yep, it's that time of year...

Sunday, October 6, 2013

Hand Applique Time!

After my disaster trying to turn edges on the carrots, I set them aside and worked on a much easier shape: the onion.

All the pieces have had their edges turned and pressed and are ready to be stitched down! I am still learning this new fancy camera and somehow keep getting a lot of blurry photos...

For the sake of color I decided to make this a nice red onion. It has a lot of gentle curves and was much easier to create. For the heck of it, I decided to sit down and try to hand stitch it down, following carefully the steps in Simply Successful Applique. It came out pretty well!


Above are shots of my first piece all pinned down and all stitched down.


First piece stitched down.  You can see the stitches, but only barely.


Second piece joins the first. I had some rippling issues, due to not properly pin basting things down as I should.


And here is the finished onion! All it needs is some embroidered roots, which I will get to at some point.


I'm pretty proud of this. It's my first real hand applique foray. Part of the reason it looks so great is the thread...Libby Lehman's The Bottom Line from Superior Threads. This is pretty much my favorite thread.  It is 60wt but super strong. I was able to purchase a variety pack so I now have spools of 36 different colors! They are only about 100 yards each, but the color variety is what counts since you don't need very much thread for hand applique.

After I finished this onion, I have continued to work on other veggies.  I'll be honest: turning all those edges so painstakingly is not very fun, but the hand stitching really is.

I kind of want to use an embroidery hoop, but it doesn't seem like anyone does for applique. Any opinions?

Now, off to work on my bell pepper block!

Thursday, September 26, 2013

Veggie Quilt Progess

Well I have been meaning to post this for quite some time. I last posted about buying the fabric for my veggie quilt. A lot has happened since then!


First off, I washed all of my new fabrics and then spent a few hours ironing and starching the heck out of them. When I stitched the edges before tossing them in the wash, I experienced a lot of bunching. For a while I thought it was a tension issue, but then decided it was just related to stitching on the edge of fabric.

See the bunching?
So, as I ironed, I would pull the fabric edge taught to break a few stitches and relieve the tension mismatch. All went well until one particular fabric, where all of a sudden the entire thing ripped as I tugged on it!

Oops.

I actually gasped out loud. There's nothing in here to show scale, but that was a good three to four inches.  I think it actually indicates that it's a low quality fabric. None of the others ripped or showed a hint of that kind of strain. 

So after I got over that shock, I cut the background squares and inset triangles. I was heavily aided by my awesome scale drawing.


I made this guy in indesign at 60p, and whenever I wanted to know the size of something I just used the ruler, saw how many p it was, and added seam allowance.  I also discovered the magic formula for half square triangles: add 7/8" to whatever your FINISHED size should be (so no seam allowance). It worked out perfectly. For each of those 5" triangles that make up the larger 10" inset triangles, I cut a 5 7/8" square and then cut it in half.  Perfect!

Then it came time to create pinwheels. I gave up agonizing over it, picked a style, and went with it. The pinwheel patterns were for 12," and mine are 10," so instead of trying to figure out weird measurements to cut of everything (which I originally tried to figure out), I foundation pieced them. I actually re-drew the design in illustrator and was able to print it out to scale very easily.

Foundation piecing in progress!

I have to say that I LOVE foundation piecing. I get into a rhythm of it and I really enjoy how precise everything comes out.  But it also highlights how shockingly bad I am at stitching a straight line. I would finish stitching a seam, pull it away from the machine, and see that my stitches wibble wobbled all around the drawn line. And those subtle wobbles really are noticeable when you fold the seam over. It's definitely one thing I want to work on.

I pretty much always work at night, so here is one of the few daytime shots of the layout in progress.


Of course kitty provided a lot of "assistance" throughout.
Trying to cut, are you?

What, you want to lay out this fabric? You don't want me rolling on it? Nonsense!

 Since completing the pinwheels, progress has slowed down for me. Do you ever find yourself procrastinating on hard parts of quilts? I sure do! I kept finding all kinds of excuses to drag my feet on figuring out the applique. Finally last week I got all the shapes chosen and laid out on the quilt.

Sorry, taken at night. All the colors are screwy because I was trying to darken it enough to make the veggie line drawings visible.

 The middle block will be a little herb garden, with lots of cute insects.


Then it was time to actually start the applique! I discovered I was out of my trusty Heat N Bond Lite, and the nearest Joann's is somewhat far, so I spent a few days debating what to do about fusible web. I want this quilt to be soft and cuddly, not crinkly. I have mistyfuse, but it's not paper-backed, which I find critical.

So, I thought I would give the steps in Simply Successful Applique a shot.


I bought this book, got super psyched about it, and then got distracted and busy.  I'm not saying I'm going to hand stitch these guys down (although you never know...I actually love hand sewing...) but I thought I would try turned edge applique.

I started with the carrots, which for some reason I thought would be easy. It's a little hard to get used to Jeanne's technique after using fusible for so long, because here you iron the template onto the front of the fabric, not the back.

Then you sit down with an iron, awl, and cup of liquid starch, and go crazy. I did get a lot of satisfaction from getting the fabric to conform to a curve or dip, but it's slow going. And I've noticed my eyes hurt afterwards from staring so hard.

Here are the carrots!

You may be wondering about the colors. My dad plants funky carrots that come out in red, yellow, white, and purple!

So you san see those curves are a bit jagged and not as smooth as I would like, but not awful.  I thought things were going well until I sat down tonight to do the carrot stalks.

I left this uncropped so you could see the cat, who loves to interfere.
Um, what was I thinking, right?? I gave it a shot....

...and here is the result of my first one (took about 40 minutes).


Not so hot. I am debating if it would be a travesty if I used fusible just for these guys, because I don't really have the skills to do such tight points yet. I did try, but this is TOUGH!

So that's the status for now. Stuck on some super tough shapes. And to be real, there are other tough shapes in this design too if I persist with turned-edge. E.G. everything in that center herb block. Hmmmm...maybe it's time to switch back to fusible?

Sunday, September 22, 2013

Quilts and Balloons

I wanted to share some quilty-related photos with you.  Yesterday was a big balloon race in St. Louis, and Friday evening was the balloon "glow."  It was a very fun event and we were actually able to walk to it due to the wonderfully central location of our apartment. Like a chump I forgot a camera so you have to put up with lame iphone photos...

This is the sight that greeted us when we arrived. We estimate there were about 40 balloons there. You could walk right up to each basket and talk to the pilot. They were even handing out trading cards for each balloon. You can see even from this picture that many of the balloons had lovely patchwork designs.


Every ten to fifteen minutes a train horn would blow, and everyone would light their balloons at once. I thought the design of that one on the left was quite pretty.


Here's one that almost looks bargello!


This is not a good picture, but I wanted to share it because this was our favorite balloon. It had lovely chevrons and a great color scheme.


This one was called "Patches" (as I learned from its trading card) and was intentionally designed to be scrappy. Pretty cool!

There were many more beautiful balloons, but my battery died. Now my boyfriend thinks I should make a hot air balloon quilt.  If you're ever looking for quilts of a particular flavor, pinterest is a great place to start. I did a quick search for hot air balloon quilts and here are some standouts:

This quilt is by Cathy Arney and is based off the big hot air balloon race in NM each year...wow!

This is by Laurraine Yuyama. Doesn't it look like a painting?

Okay so pinterest is a black hole so I'm going to stop myself there before I spend all day staring at amazing quilts instead of working on my own.

Sunday is my sewing day, so today I plan on getting a lot done. It is also chore day so I am going to intersperse sewing with housecleaning (yippee!) I always get lots of sewing help from this one:
"What, you want to use this cutting board?"

Yes, that fabric under her bum is stuff that I *was* attempting to cut. Okay progress on the veggie quilt will be posted tonight!