Pages

Tuesday, November 27, 2012

November FMQ Challenge

Yes, I have skipped ahead to actually complete one of these challenges on time! (Barely!)

This month's instructor, Sarah Vedeler, provided instructions on stitching swirls in a line.  Now I really enjoy stitching swirls because they're easy, fast, and pretty forgiving. I've used them in a few past sewing projects:
Swirly waves with echoes around them

Swirls in between stars.

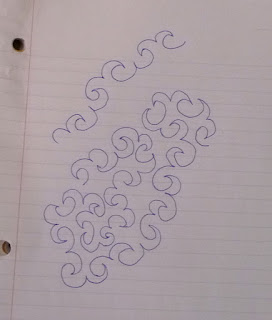
But stitching in a straight line was much more tricky.  To be honest, I found stitching all those spirals to get very tedious very quickly, and as a result I got more and more sloppy as I went along.  You can see the same thing on my practice sketching:


See how that second-to-last spiral is a total mess?
So here is my finished practice swatch:
I marked out a 1" line for the border and 2" strips along the conter before I stitched. However, you can't really tell that these are going in a line which I guess says something.

One problem with stitching in a line was that I was left with gaps like the one below:

 I went back and tried to fill those in once the whole thing had been stitched once.

I followed Sarah's method of switching back and forth between clockwise and counter-clockwise for each spiral. I used to think I was better at one way than another, but I think I just have trouble getting started in one direction, once the circle is going I am fine either way.

I also tried back-tracing my original stitch instead of going back in-between the first spiral.  I found that these spirals always came out looking much better. I think it's hard when you're going back between the lines to be perfectly centered between them.
back-traced (I know that's not the correct term, but you get it)

just a close-up of part of the design


 All in all this was a valuable lesson for me: I don't like designs that have too many restrictions. I'm not a precision person and I get really bored really easily.  When you're going in a straight line you don't have to think about directions, and when you are only stitching one thing you don't have to think about what to stitch next.  So while I love spirals, I hate spirals in a line!


Thanks as always to SewCalGal for arranging this great year-long sequence and thanks to Sarah for the detailed tutorial and practice sheets.

Saturday, November 24, 2012

Weekend Finishes and Missing Fabric

It's every quilter's greatest fear: running out of a fabric at a critical moment and being unable to find more of it.  I basically had that situation today.

My Stairway to Cat Heaven quilt (below) is pretty much entirely based around this completely gorgeous star fabric.


I found the star fabric first and built the other colors around it.  I am making a second copy of this quilt by special request, and when I went to the quilt store today they had no more of the starry fabric. I went ahead and bought the other fabrics, but knew I had to find that starry blue, or the whole quilt's color scheme would be thrown off!

Because it's a batik, I have no selvedge with the name of the fabric and line on it.  I had no idea where to start.  Recently I was approached by findmyfabric.com and this was the perfect chance to test it out.  They have a pretty nifty idea, you can upload a photo of your fabric and they will find that fabric or find similar looking items.  You can also enter search terms.  Unfortunately, I think they need to build up their fabric library more before they will become a really awesome resource.  They didn't find my fabric but when I searched "blue batik stars" they did provide a good alternative fabric.

What ensued next was about an hour of desperately searching every batik fabric site in an attempt to find my starry fabric or an acceptable substitute. I did eventually find it; it's out-of-print and the website only had 1 5/8 yards of it left - and I need 1 3/8 yards.  Phew. Very lucky break there.  So what worked?  Google image searching "batik blue star metallic"and clicking this very tiny and blurry thumbnail.


So...I really hope it's the right fabric when it comes lol.  I'm pretty sure it is. I'm not sure what the moral of this story is; perhaps never give up, because I visited a lot of sites before I finally found my fabric. Anything is possible on the internet!

Anyways, I've been getting a lot done this weekend. On Wednesday I pieced together this charity quilt top for my guild:
It's so big I can't actually hold it all the way open; over 80x80! And it's too big for my floor. I've never made a top that big. For this charity project you don't have to quilt it; thank goodness! Each month our guild does fun challenges for their charity quilts to encourage people to participate.  This was a "race to the finish"where someone in the guild created all those HSTs and then donated them because they abandoned their project.  So I was given the sashing fabric and the HSTs and told to finish the quilt however I wanted.  This was fun and easy and definitely made me feel accomplished.  Also then I feel less guilty about the charity quilt I took back in June or July and still haven't finished...

I also knocked out the January block for my guild's BOM.  I'm trying to do these further in advance.

I also did a little cleaning and organizing of my quilt space this morning.  I had a giant pile of papers from various shows I had been to just taking up space.  So this morning I went through it all.

Good thing too; turns out there were a bunch of patterns from my visit to PIQF tucked in there, including this cute Christmas pattern! There were also a lot of ads for quilt shows that happened back in August and September...oops.

At least now I have a new project to add to my to-do list :)

Tonight I'm going to finish my owl wallhanging, so look out for an upcoming post on that project!

August FMQ Challenge

Yep, I've finally made it to August! Now only September, October, November, December, and the bonus tutorials to go! :)

This month's artist, Wendy Sheppard, provided a "jester hat" pattern. Because I'm so behind, I did get to see how everyone else did on it, and I know some people struggled, so I was apprehensive.  Here's my first page of sketching; it did not go great.

The trick was figuring out how to transition from one hat to the next, while changing the direction/orientation of the hat.  What worked for me was actually tracing Wendy's line drawing to see how she did the transitions. I came up with a system where I alternate up and down hats, as you can see in that top line.  Then I just looped it around instead of doing a line.

There were definitely a few tricky spots where I wasn't sure where to go or how to transition.

Here is my completed placemat.  The verdict: I LOVE this design! I always enjoy stitching swirls and spirals, and this is a variation on swirls that I can definitely get behind.  I really love the texture it give to my placemat; some of the other designs we've done are great if you want to look at the quilting, but for fillers/background quilting they don't provide a ton of texture.  This one does the opposite; I mean just take the fact that it photographed so well!  I definitely see myself using this in future.

A few close-ups:


Thanks to SewCalGal for hosting!


Monday, November 19, 2012

Small Updates

Now that I'm done with Christmas projects, I'm returning to UFOs and trying to wrap up all existing projects by the end of the new year, and before I get too ambitious and start on something else.  I am kind of waiting for the new year to start on new projects because I hope to join some BOMs for 2013.

Today I tried to start quilting my owl wallhanging (the one I was hoping to do for Halloween? Oh, yeah....).  I am having a big problem with my stitches skipping.  I rethreaded the machine and it's still not working.  Check out the wing on the owl below.


I realized I haven't switched out the needle so I will try that next.  I think the problem has to do with the fusible web making it really stiff and hard to punch through.  I can't remember if I used the Heat n Bond lite or Heat n Bond ultra hold since I made this a while ago...hopefully it was the lite.  Anyways, this setback is a bummer because I wanted to knock this out tonight.  I think I will move onto some other areas of the wallhanging and then come back to the owls.


Anyways, my other finish is the December block for my guild's BOM:

My three colors

The finished block.  It's supposed to be a basket but if you turn it upside down it makes a good house.
If you zoom in on that pic you will see that my seams are horribly off - somehow the middle portion is like a half inch wider than the top and bottom portions.  Oh well.  Piecing does not appear to be my strong suit.  I decided to make this BOM a "quilt as you go" which I have never done before, but never a better time to try!

And in final news, I bought Melinda Bula's book "Cutting Garden Quilts."
I really want to make a quilt like hers.  This book is amazing.  Unfortunately it requires having a million shades of each color so you can get it just right...my stash is nowhere near ready for a challenge like that.  Anyone know of a good place to buy fabric scraps or small pieces in batik shades?  I wanted to do a wallhanging yesterday that required a bunch of shades of green and I only had like two.  And I need like a charm square or less of each shade. So that project is on hold.  I am planning a black Friday trip to Joanns to load up on stuff...25% off your entire purchase before noon!

Okay that's all for now.  I am going to tackle that wallhanging again soon.

Sunday, November 18, 2012

January and July FMQ

Yep, I am back to working on completing the FMQ challenge.  My plan is to complete one month's tutorial a week, which should get me close to finishing on time.  I am almost out of the placemats that I have been using as practice swatches, so I decided for the first time ever to do a "quilt a you go" with a block of the month I am doing now, so that I will have more actual blocks to practice on.


January's tutorial by Frances Moore was on basic leaves.  This is a good beginner design (probably why it was put in January) but since I waited until November to do it, it was very easy. So I just stitched it as the border around my placemat.

I messed with the values on this to try to make the stitching stand out more.


I did notice it was sometimes tricky to stitch the leaves pointing in a new direction. I have also seen some designs (Patsy Thompson does this a lot) where two threads are used in the same design, and I think the leave could be could for that.  The second thread could be for the veins and add some flare along the vine.  I didn't try that here but I do want to try it at some point, and this FMQ challenge is a good opportunity.


Onto July! July's tutorial, by Angela Walters, was for a pretty cute modern blocky design.  You could fill it with whatever you wanted.  Angela filled her sample with spirals and I love stitching spirals so I did that for mine too.

Here are a million photos:


 I noticed a few things stitching this:

  • I am pretty bad at stitching straight lines, even if they are marked. My cubes were a little wobbly.  
  • I have a really hard time switching between making the spirals clockwise and counter-clockwise.
  • I always stitch really close together, I have a very hard time leaving empty or white space.  This is bad because I want my quilts to be fluffy and soft, which means I need to quilt further apart, which is really hard for me to do!

finished placemat

This was a fun design that I could see myself using, in the right situation.  I still have a very hard time figuring out what designs should be stitched on a quilt, and whether you should just an all-over filler like this one, or something that caters more towards the quilt pattern (I lean more towards the second, but it's a lot harder.) Along those lines, I can't remember if I've mentioned this before, but I bought a while back "Free Motion Quilting Made Easy" by Eva Larkin.  She gives a few very basic and easy FMQ shapes and then shows you how to combine them to make them look really complex and to use them to enhance your quilt pattern design.

I do notice when I go to quilt shows that when the quilting is part of the design, it makes a huge difference.  When I went to my guild's show, Quilting by the Bay, I brought along some family members who were not quilters.  Some quilts they would brush right over because the colors weren't interesting, but I would point out the quilting and make them take a second look.  It was fun to see how quilters and non-quilters viewed quilts.  I am always looking at quilting designs now and trying to get ideas an inspiration.

Here is the perfect example:
 My family members brushed right by this sampler quilt, but I stopped to take a closer look and was incredibly impressed with the quilting choices.  Each block had a different design in it, chosen to specifically enhance that block.

 Here are some close ups...really impressive.


One day I want to be able choose designs like this that enhance the overall quilt perfectly.

Alright, today I am hoping to get the August tutorial done, although those Jester hats look very tricky!

Sunday, November 11, 2012

50 Day Hustle!


This is my 100 Day Hustle list. I am actually feeling pretty good about my hustle progress–after today or tomorrow I will have finished all of my sewn Christmas projects which gives me the remaining ~48 days to do fun things and catch up on that FMQ.

1. Monthly Guild Project - On track! Here are the completed October and November blocks:

2. Jacket - bumped
3. Charity wholecloth - also bumped
4. Christmas presents. - So close to being complete!
Here is one finish I can post about: apron for my brother (pretty sure he doesn't read this blog...).

I used the super easy free pattern from J Caroline Creative (thanks Quilt Inspiration!) As a side note, I really don't understand all of these aprons that only cover your lower half.  When I wear an apron, it's to prevent flour/oil/etc from spattering all over my front while I'm cooking. Very rarely does something every spatter my legs, and very often does something spatter my shirt!

Anyways, it was tricky for me to find a "manly" fabric for this, because as you might notice, I really favorite very bright colors. Luckily Joann's had a great selection of these "home decor" weight cottons in subtle shades.  I was able to throw in some cute with the chickens on the pocket though. :)  This assembled in pretty much a single day.  Just cute one big piece for the apron, cut one for the pocket, and you're there!  Time-wise, this has good potential for mass production.  Cost-wise, not so much.  Even with all of my coupons, I would estimate I spent about $20 on the materials for this (that home decor weight fabric is expensive...)
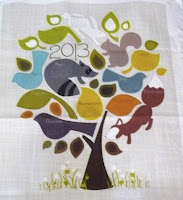
The only remaining Christmas project is small present for my co-workers.  I decided that I didn't want to spend much time or effort on these, so for the first time I used Spoonflower. This is a website for custom printing fabric, or you can order from their extensive user-submitted fabric library. They have tons of adorable fabrics, and I love following their weekly themed fabric design contest, but their fabric is way too expensive to ever purchase (like $20 a yard...)

However, every year they have a special sale for these tea towel fabrics and even though it's damn expensive for a mere fat quarter, it saves me a lot of stress and time that could be spent on projects I care more about. So today my new tea towel fabrics arrived in the mail: (side note: Spoonflower takes forever to ship, I guess because they're custom printing your stuff. But, factor that in if you ever order anything from there!)


So all I have to do is basically stitch a hem around each of these, and they will be complete!

5. FMQ Challenge/placemats: I have started again! (After 5 months....big step!) Today I knocked out both the January and July designs in one fell swoop, and even slapped the binding on this placemat.
The July patten is in the center, and I stitched the January pattern as the border. I am enjoying these FMQ designs, but where I still am lacking is figuring out what stitch to use in a space to enhance the design - not necessarily as filler. One of my Christmas projects (which I can't post about yet) entailed stitching on a paper pieced pattern, and I had trouble figuring out what stitches to put in each space to enhance the design.

All in all I think I am actually on track to complete everything (granted I crossed a bunch of things off, but whatever).  If I have time, I would also like to do some Christmas decor. I might be getting my own tree for the first time ever this year, in which case I will need a tree skirt.  However, I don't want to rush into making one because there are just so many great patterns out there...I want to take my time and make something special.  But I do have a little paper piecing pattern for a little 12" Christmas wallhanging that it would be nice to complete.

Okay linking up with Kelsey Sews...go see how everyone else is doing on their hustle!