Every year I try to do one block of the month. It's fun, easy, and has an air of instant gratification. The year my BOM is the free
Rosemaling in Baltimore quilt offered by AQS. It's technically a mystery BOM since they have no photo of the finished product.
I happen to LOVE Baltimore applique. Here is an example of a Baltimore quilt from one of my visits to PIQF:
I'm not very good at describing what makes a Baltimore - but you know it when you see it! What's cool about classical Baltimore quilts is that each block had symbolism and indicated something personal to the maker. That's why they are known as Baltimore Album quilts - because the finished quilt was an album of your life.
Here's one more Baltimore from PIQF. I just love them.
Why do I love them? I appreciate the intricate details and the dynamic layout. Each block is a unique joy to explore. Each one has hidden treasures. Plus there are lots of fun bright colors!
One of my favorite applique designers is
Pearl Pereira who has made several fun modern quilt designers in the Baltimore style, including a Baltimore Halloween, spring, autumn, Christmas, and more! I have bought her Baltimore state blocks for Alaska and California but have yet to tackle them.
So anyways, back to Rosemaling in Balitmore. The idea of the quilt is to combine Rosemaling motifs in a Baltimore layout. I looked up Rosemaling (I had never heard of it), and it is a traditional folk art from Norway often featuring painted stylized flowers.
Here are some Rosemaling snaps:
Pretty stuff, right? I have been greatly enjoying working on the quilt so far. I intentionally chose colors well outside of my usual bright comfort zone.
These were based on a Joel Dewberry bundle I won at my guild sew-in. Unfortunately a lot of the fabrics in the bundle have big, bold prints which don't work well with tiny applique pieces. But hey, let's try it anyways! It's my challenge to myself and my attempt to somewhat modernize the pattern with my fabric choices.
I also tried to be a bit modern with my background fabric. I picked a fun geometric print to offset all of the curves in the applique.
So, as you may recall, I taught an applique class in October. For the class I bought a TON of different applique supplies, with the intent that my students try them all out. Well, they didn't really try them all out, which left me with a lifetime supply of fusible web. So I decided to try it out on this project For my first block, I used Heat N Bond Featherlite.
This is a new product from Heat N Bond that is supposed to be lighter than their other fusible webs. Heat N Bond lite is my favorite fusible but I will admit that it is a little stiff. So I was very hopeful about the Featherlite.
Verdict: a massive disappointment. Do not buy. I had nothing but headaches with it. It's hard to describe how many thing went wrong. The webbing is certainly light - too light. I couldn't get anything to stick. On one fabric, the paper accidentally peeled off and I couldn't even get it to stick back onto the webbing. Nothing stuck. I had to use my Roxanne glue baste it to glue everything in place on my background. And while it was noticeably softer than Heat N Bond lite, it flat out couldn't get the job done (and it was no mistyfuse!)
You can see from this angled picture I took that literally nothing is sticking down. It's only held in place by inertia and positive thinking.
After this block I actually gave away my remaining Heat N Bond Featherlite at my guild freebie table.
But the block came out fine in the end anyways:
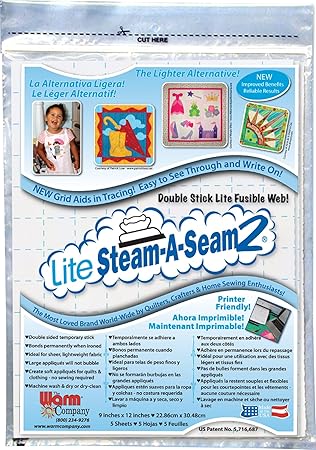
For the second block, I used Steam a Seam 2 Lite.
This stuff is super popular, but it's noticeably more expensive than other brands and Joann's (where do I a lot of my notions shopping) doesn't stock it. I had never tried it.
The verdict: Love it. I found the double paper annoying but I loved the tackiness. The hook of steam a seam is that it is super tacky so you can lay it in place on you background and it will stay. For this block, with tons of tiny pieces that needed to be positioned just so, it was perfect. I laid everything out, rearranged until I loved it, and only then ironed it in place. I had no trouble with fraying edges (like I get with Pellon), and the finished product was surprisingly still soft. I may have a new favorite brand!
Here are my finished blocks 1 and 2:
This is definitely my fun, "anything goes" quilt. I have another project I am working on (to be posted soon!) where I do a lot of agonizing. I always seem to have one of those, so it's important to have something fun and easy to offset that. Block 3 just got released, so I am off to work on that! This time I will try Pellon EZ Steam. Verdict coming soon!