Pages

Friday, March 30, 2012

Quilt Finished and "Why Quilts Matter"

Here's the finished Animal Alphabet quilt:

It has already reached it's new home! As a reminder, this pattern is from Don't Look Now: http://dontlooknow.bigcartel.com/product/animal-alphabet

I'm now working on needlepoint for a few weeks before I start on my next project.

In other news, I just finished watching the documentary miniseries "Why Quilts Matter" on thequiltshow.com.  And frankly I was incredibly disappointed!  I don't consider myself a "traditional" quilter per se, I am really interested in art quilts and can't wait to try making some myself, but this show was WAY too focused on quilts as a monetary piece of "art" that can be bought or sold.  I mean, there was an entire episode about appraising quilts!  The host isn't even a quilter, she's a "collecter."  I felt like the show rather disparaged traditional quilters (like basically poo-pooing anyone who had negative things to say about the Gee's Bend quilts-also I swear they found a way to mention Gee's Bend in every single episode.  There are other art quilters out there too!).  Basically I felt like it only focused on a sub-set of the quilting community (no, we don't all sell our quilts, and there's plenty of innovation going on within the people who still make quilts to go on beds!) and made it sound like all other quilters are backwards "crafters" who don't really deserve a second thought.

The only episode I liked was episode 8 ("Quilt Nation") because it was the only one that actually talked about quilters.  The rest were seriously focused on collectors and quilts that are bought and sold in galleries and museums.  Anyways, I'm sure many people loved this series, but I wasn't interested in the topics it covered and felt like it had some pretty strong opinions on what was right or wrong, what kind of quilt was "good" or "bad."  I think what is good or bad is all in the eye of the quilter that makes that quilt, and I don't really have an interest in other people judging whether my quilts are "worthy" or not.  I guess, according to one guy in this series, I'm a "Sunday painter." (yes, I'm miffed).

Tuesday, March 27, 2012

Blog-o-sphere drama!

Every once in a while, the whole quilting blog community finds something to get up in arms about. I find these situations very interesting to follow because quilters are generally a very polite bunch, so it's very interesting to see how everyone reacts to these volatile situations (I am reminded of last years "tradition vs modern" hullabaloo).

This past week, it has been an issue over copyright related to fabrics and quilt patterns. Here is my interpretation of the facts:

-Blogger Emily Cier published a book of quilt patterns.  One of the sample quilts photographed for the book was made completely of one designer's fabric line (Kate Spain).
-The book publisher, C&T Publishing, decided to choose that quilt to print on tote bags that they make up to promote many of their books.
-Kate Spain's lawyers asked C&T to not print the totes as it violated copyright.  Overreactions and miscommunications ensued on all sides.

Now there's plenty more to the story, you should read the following statements before you draw your own opinion:

Emily's posts:http://carolinapatchworks.com/blog/2011/11/17/an-interesting-read/
http://carolinapatchworks.com/blog/2012/02/14/resolution-to-an-interesting-read/
http://carolinapatchworks.com/blog/2012/03/22/more-sides-to-the-story/
C&T Publishing's post: http://www.ctpubblog.com/2012/03/26/a-few-thoughts-about-copyright-and-quilts/
Kate's post: http://katespaindesigns.blogspot.mx/2012/03/on-copyright-and-tote-bags.html

Many quilters are upset and are saying they will now boycott Kate's fabrics.  Kate points out that she is just trying to protect her livelihood.  Quilters are mostly concerned about where the line is drawn between what uses of fabric are copyright violation and what are not.

Here are my thoughts on the issue:
  • Ignoring who is right or wrong, I am very confused as to where the line is drawn between what is copyright violation and what isn't.  Why is printing a photo of a quilt using a single line of fabric okay for a book but not for a tote?  Both items are mass marketed for profit of people other than the original fabric designer. 
  • As many have pointed out, what are we to do when a quilt is composed of fabrics from many different designers?  Where is the line drawn that you need to cite the fabric designer? 
  • And, most interestingly, the CEO of C&T posed a question that I will quote here: "Who is the copyright holder of an original quilt design? Is it the person who designs the quilt, or the person(s) who design the fabrics used in the quilt? Is it a percentage of both? Does the photographer who takes a photo of a quilt own the copyright to the photograph?"

All food for thought.

Here's another food for thought:  I'm currently reading Heirloom Machine Quilting by Harriet Hargrave.  In it she goes on a rant about people who don't quilt their own quilts: "A growing percentage of quilts at quilt shows are not quilted by the person who made the top.  Many are quilted similarly, on longarm machines.  Where is our guide and inspiration for quilting all of the tops we've been lured into making based on pattern, design, and color? So often, out of frustration, we neatly fold the top, and start another pretty project...What happened to turning beginners into quiltmakers, not topmakers?

Ooooh...them's fighting words! Anyways, this paragraph really made me sit back and think about how I'm approaching quilting. She really advocates for thinking about how you will quilt a quilt before you even begin with the pattern.

Tuesday, March 20, 2012

March FMQ Challenge

March: Ann Fahl!  By the way, over the weekend I watched her show on The Quilt Show.  Her cat quilts are fantastic and totally adorable!

I really liked the background information she provided.  I'm still completely flummoxed by thread and needle combinations, and what type of thread to use where.  I usually just grab whatever color I need and don't look at the style or thickness or any of that.  So this was good help.

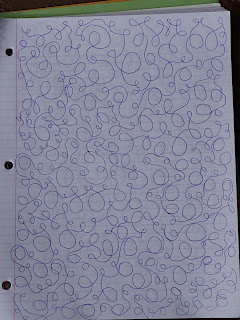
As for the notebook, I read a lot that sketching out designs is helpful, but I had never done it until now.  I generally do a practice "sketch" with my machine on scrap fabric and figure it out that way.  For some of these designs that I am already comfortable with I didn't find the sketches particularly helpful, but for designs that I am having trouble with (FEATHERS!) the sketches helped my brain think about how to form the shapes and transition between them.  Anyways, here are the first sketches I completed in my notebook:
stippling!  I hate stippling so this was good practice because I can never figure out where to go next.  I'm not even sure if this is good stippling shapes or what good stippling should look like.  I tend to avoid it.

Loops.  I am also watching the FMQ classes by Patsy Thompson on the quilt show, and she suggested loops of varying sizes, which I don't normally do, so this was interesting to try out.  I'm very comfortable with loops as filler; I just used them on the baby quilt I finished.

Hearts.  I actually had a really hard time drawing them pointing in any direction other than vertical.  However, I didn't have this problem stitching them.

Feathers!  I'm still trying to figure out their shape.  It seems some heirloom quilters draw or stencil on their feathers before they stitch them, so I might try that in the future instead of trying to figure out the shape as I go.  On the right I was trying to figure out how to form the teardrop shape properly.

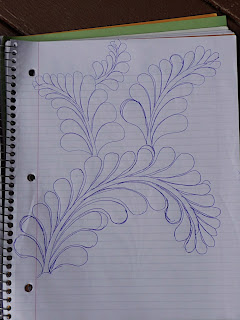
More feathers.  My brain is having a hard time wrapping itself around their shape.

And then to the stitching!  I tried out a bunch of designs on one single block.
Also over multiple days, hence the variety of threads.

On the upper left, I was testing out some potential border designs for a different project.

In the rainbow thread in the middle I did hearts and little flowers with loops in between.

In the upper right I tried bigger flowers with some leaves.  They were going okay until I tried to echo around them, which was just a bad idea.

Then I tried two styles of stars, neither of which I really loved.  It's hard to start into a shape and figure out how to incorporate that line you're already coming from.  For example, on some of the flowers I tried to make my existing line into one of the petals, but often it didn't work out and the line would just go to the center of the flower instead.

Then I tried some spirals.  These generally went well, there are some spikes where I transitioned but I think that's okay.

Then I tried another feather.  I really want to make these work!  I have to say, even though my feather generally sucks, Diane's method of echoing around it really makes it look better and sort of smoothes over the trouble areas, or makes the eye not really notice them.

And I finished up with some stippling, which I loathe.  All in all it was fun to try out these different designs!

This week I am sitting down and actually READING some machine quilting books I have, including Diane Gaudynski's.  Usually I'm too impatient to read the content and just flip through to look at the designs, but since I'm in between projects this is the perfect time to really do some book learning.  I think it will complement the practical things I am learning in this FMQ!  Last night I started "Heirloom Machine Quilting" by Harriet Hargrave.  She also does a lot of feathers so hopefully I will get more tips.

Saturday, March 17, 2012

Quilt top quilted!

Here it is!  I finally took a photo outside to get some decent lighting.  I outlined all the animals and did little loops as filler between them.  On the border I had a very hard time thinking of a design.  I finally went to the quilt shop and flipped through about every machine quilting book they had looking for ideas, then found the stitch that I ended up using, a spiral with spikes around it.

But, let's backtrack!  Last time I posted I had just finished the main top.  Then I went fabric shopping during for the border, backing, and binding fabrics.

border fabric

This is the fabric I selected for the border.  I think it's absolutely gorgeous!  It's perfect because in my head I wanted something rainbow colored and striped for the border, and this meets both criteria while being a little more interesting then plain stripes.

Above is the quilt top with the border on it.  I was worried when I got home that the border was too bright, but I think once assembled it looks pretty nice.
backing flannel

For the backing I ended up with a flannel, because they were on sale, so why not!  It's pretty great too because it has an animal alphabet theme!


Here is the quilt sandwich.  I *always* get lumps in my quilt.  This time after I made the sandwich I would basically check each section before I quilted it to ensure it was still flat.  One problem is that I didn't set the presser foot pressure to zero so it was pushing fabric around as I quilted.  I quilted from the center out so this was generally fine, but in a geometric pattern I think it can screw up your squared edges.  I ended up with only one tiny lump in the front and one unfortunately large lump in the back.  But oh well, the recipient won't mind.  :)
the lump!
Here's a shot of the back, and a close-up to show the border stitching.

a little snippet of the front to show some of the stitching

Finally, wanted to share an amusing anecdote from attaching the binding:  Notice something wrong with this picture?
The binding is twisted!  And this is after I had joined the ends.  So I had some seam ripping to do, only a little, but I thought it was funny.  And then I proceeded to do the same thing again!  But I finally figured out how to put right sides together without twisting it a million times.  :)

Now just to hand-saw the binding onto the back and add in a label.

Wednesday, March 14, 2012

Bernina Class Lessons Learned

Today I finished the second part of my Bernina I class.  This is offered free by my Bernina dealer and can be taken as many times as you like.  Case in point - the woman next to me bought her machine ten years ago!  I took this class when I first bought my machine two years ago, and am embarrassed to say that even having taken it before, I learned a TON of new things this time around!  This has now firmly instilled the belief in me that it's good to take a machine education class if you can, no longer how long you've had your machine.

I kept a running list during class of all the new things I learned (or incorrect things I unlearned!)  Maybe some of these are things you can learn from as well. BTW I have a Bernina Aurora 440QE.


  • I was threading incorrectly when winding my bobbin, by not going around the back hook before looping around the little circle on top of the machine
  • I learned how to easily unattach the board that snaps on to give more quilting area.  I knew there was some trick to it, but usually I would just tug until it came off and hope it wouldn't break!  I learned you put your thumb in the little thumb indentation and curl your fingers around the board to get it to pop right off.
  • This is pretty obvious, but if you step with your heel on the presser foot, it raises or lowers the needle.  It's even drawn right on there! 

  • Your bobbin is supposed to spin clockwise.  I didn't learn this until I was trying to figure out my tension problems last month.  
  • Believe it or not, I was putting my thread on the spindle incorrectly.  See photos below.

No foam thingy behind the thread, and even though in this picture there's no stopper, I was using the medium stopper.  This is bad for big spools like aurafil because they aren't evenly sitting on the spindle.

You're supposed to put that foam thing behind it for support.  And I learned what the littlest stopper is for!  It fits perfectly into the aurafil tip so it sits properly on the spindle.
  • We also learned how to take off the stitch plate and clean out our machines.  Last time I took this class I think we just briefly discussed it, this time we disassembled everything together and actually used our little cleaning brushes (an item I didn't know the use of) to get it looking good as new.
  • The bobbin case has a little eyelet (pig tail or something?) that you can thread through to increase tension for satin stitching.  I wish I'd known that before I stitched all those animal alphabet letters!
  • Raise the presser foot when threading the machine so there's no tension
  • Finally, a clever trick for plugging in the BSR:  You can see the green spot reflected in the stitch plate so you don't need to stick your head under there to see where to plug it in!

click to see a better version

The class was very fun and I'm glad I went.  In the meantime, I've finished quilting my animal alphabet quilt except for the border, which I am having difficulty selecting a design for.  Photos soon!

Sunday, March 11, 2012

Free Motion Quilting Insights

I've been free motion quilting my animal alphabet quilt...my first machine quilted quilt!  Previously I've machine quilted wallhangings and a vest.  I'm already noting a lot of insights from quilting this project.

  • On the recommendation of many, many blogs, I bought a sewslip.  Throughout quilting I've been taking it on and off at intervals to see if I can tell a difference.  I definitely!  Without the sew slip, the movement of the quilt after each stitch is choppy/stilted/jerky.  With it things move very smoothly.  HOWEVER, I have been having trouble with the edges of the sewslip catching on my quilt and creating a lot of drag.
  • The quilt does not move nearly as easily or smoothly as my practice swatches and wallhangings have.  There's a lot of resistance and I'm actually working out my arms shoving it around.  I think this might be partly due to the flannel backing, which grips more, and partly due to the increased heft of this project.
  • I can't figure out how to use the BSR 1 function on my machine!  Luckily we will learn this in my Bernina class on Wednesday (more on the class in another post...it has also led to many insights about my machine).  For now I'm just sticking with BSR 2.

So far I've mostly managed to avoid lumping by carefully planning out my stitching direction and periodically smoothing out the quilt on the floor to make sure everything looks flat.  I've had a few small lumpy spots, but not bad!

I originally was just going to outline the animals to minimize the amount of quilting because I want the quilt to stay fluffy.  However, I also wanted a continuous line so I ended up loop-the-looping between animals so I wouldn't have to start and stop.  This looked weird with only a few loop-the-loops, so I went back and now the whole thing is looped.  I just hope it's not too stiff to be comfortable, because using fusible web adds stiffness too.

Along those lines, I'm still trying to figure out how much/little to quilt a quilt that I intend to use.  This one was hard because there's narrow space between the animals, so unless I wanted to stitch over them I needed to do a pretty narrow quilting design.  Maybe for future baby quilts I'll stitch with patchwork so I can do wide/broad quilting to keep them soft.

Also, an insight carried over from hand quilting, is that the animals pop more if you quilt around them with a gap (like an echo) instead of just stitching in the ditch around them.  So of my animals ended up with wider stitching around them than others.

Tension, by the way, has been fine!  I think my tension problems from earlier were related to a number of threading errors (which I learned about in my Bernina class) and the fact that I was using BSR to applique a single layer of fabric, when it's more programmed for a quilt sandwich.

Anyways, the top is looking on track to be finished today!  Luckily the recipient probably won't notice all of the errors I've made, I just hope it's soft and fluffy enough for her to enjoy it.  Nobody likes a stiff quilt!

Sunday, March 4, 2012

Animal Alphabet top appliqued!

As I hoped, I finished all of the machine applique on the top today.

I decided to draw all of the animal eyeballs on because I really didn't feel like doing hand-tied french knots on all of them, but I'm wishing a little that I had sewn eyeballs on, because the drawn on one don't look fantastic.  Also some of the eyeballs ended up in weird places, I probably should have drawn them in marking pen before I did in permanent pen.  Ah well, you live and learn!

So without further ado, here are all of the finished animals:


And here's the back of the top, nicely showing all of the stitching I did!

Quilted Jacket and General Updates

Animal alphabet quilt: Top is *almost* done!  I am hoping to finish all of the applique today if I push it.  Once I do I'll post another 26 shots of all the finished critters. Joann's is having a massive sale right now so today I bought some gorgeous border fabric and really cute flannel backing fabric for the baby quilt.  I should get it ready for quilting this week.

FMQ Challenge:  I just discovered a bunch of free motion lessons online at The Quilt Show!  I just subscribed to this website last week and I'm already overwhelmed by the wealth of information available on it.  I think my (unrealistic) goal will be to practice some form of free motion stitching once a week.  I still want to work more on February's feathers before I move on to March (or catch up on January!)

Now, onto to main topic of this post: a quilted jacket!  While at the Pacific International Quilt Festival in October I bought this pattern for a quilted jacket, intending to make it for my mom.
Find a ton of neat jacket designs at http://www.lorrainetorrence.com/
Well she was concerned that it would look too old for her, and sure enough when I made the muslin foundation it came out like this:
It looks like a lab coat!  Very baggy and very long.  I tried to tailor it myself but since I've never made clothing before I had no idea what I was doing.  After some thought I decided to find a new, more youthful pattern for a jacket, then use the quilting design from the Lorraine Torrence pattern on the other jacket foundation.

I ended up with this pattern:


It's great because it comes in petite, and because simplicity patterns are made for people who don't know what they're doing.

So here's the new foundation:

Yes, I look like a grouch, but isn't the jacket cute?
Apparently in my zeal to make it petite I actually shortened it too much, so I'll have to sew on some extra fabric to the bottom or something.  The trick now will be to adapt the triangle design from the original pattern properly over to this one.

When I was visiting AK I bought all of the fabrics for this jacket, with input from my mom.  I bought enough fabric that I can probably make two matching jackets!  Here is a shot of the color scheme:

This photo does not do these amazing colors justice!

Anyways, this project is going to be set aside for a quite some time, because I really want to finish the two quilts that I am currently in the middle of so that my stack of projects in progress is not so large.  I *really* don't want to get in the habit of having a lot of unfinished projects lying around!